· Todd Martin · DIY Projects · 13 min read
How To Make A Wood Bench With Back

How to Make a Wood Bench with Back: Your Complete DIY Guide
Do you dream of a comfortable, custom seating option for your patio, garden, or entryway? Learning how to make a wood bench with a back can transform your space. A handmade bench provides a unique touch and adds valuable seating. You can create a durable piece that fits your exact style and needs. This article guides you through the entire process, from initial design to the final protective finish. We cover essential tools, material choices, and step-by-step assembly.
Takeaway
Building a wood bench with a back is a rewarding project. You gain a functional, custom furniture piece. The key steps involve careful planning, accurate cuts, and secure assembly. Finishing your bench correctly ensures its longevity and beauty.
- Plan your design and gather all necessary materials and tools.
- Cut wood pieces precisely and assemble the bench frame securely.
- Attach the seat and backrest slats for comfort and support.
- Apply a protective finish to guard against weather and wear.
- Maintain your bench regularly for lasting beauty and strength.
How to Make a Wood Bench with Back
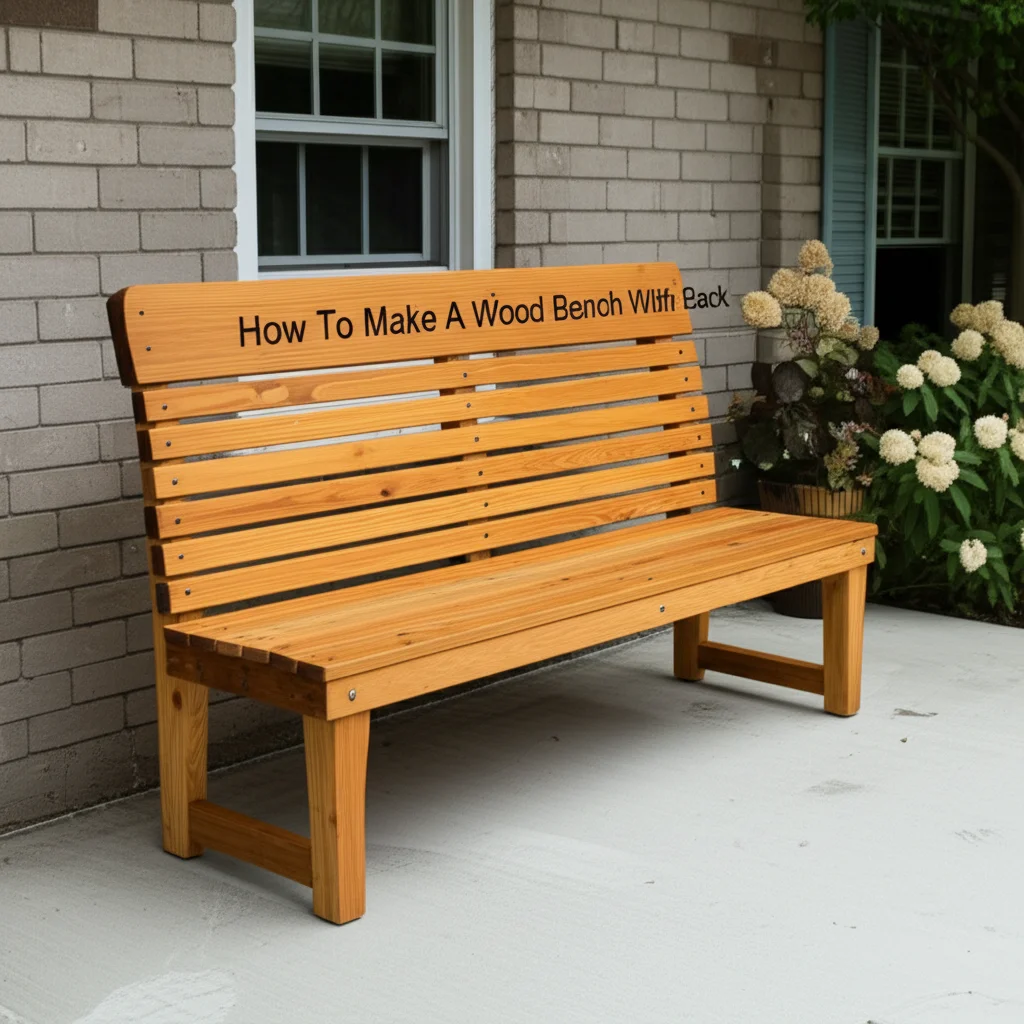
You can make a wood bench with a back by following specific steps. First, choose a design and gather materials. Then, cut wood pieces to size and assemble the main frame. Next, attach the seat slats and the backrest components. Finally, apply a protective finish to the completed bench.
Planning Your Wood Bench with Back Design
Before you cut any wood, careful planning sets your project up for success. Consider where your finished wood bench with back will sit. This helps determine the right dimensions and style. A bench for a small patio needs different measurements than one for a large garden.
Think about the number of people who will use the bench. A standard two-person bench is about 48 inches long. Three-person benches are typically 60-72 inches. The seat height should be comfortable, usually around 17-18 inches from the ground. The backrest angle is crucial for comfort; a slight recline is often preferred. I always make sure the back offers good support without being too upright.
Consider the style of your home and garden. Do you want a rustic look, or something more modern and clean? This choice influences the wood type and finish you select. Sketch out your design on paper. Include all dimensions for each piece of wood. This detailed drawing acts as your blueprint. It helps prevent mistakes during the cutting and assembly phases. You might find it helpful to look at existing bench designs for inspiration. You can adapt them to fit your specific vision. This initial planning saves time and effort later on.
Selecting Materials and Tools for Your Wood Bench Project
Choosing the right wood and having the correct tools makes building your wood bench with back much easier. For outdoor benches, select weather-resistant wood. Cedar, redwood, and pressure-treated pine are excellent choices. They resist rot and insects well. If your bench stays indoors, pine, oak, or maple work fine. I often choose cedar for outdoor projects because it smells great and lasts a long time.
You also need sturdy fasteners. Use exterior-grade screws or galvanized bolts for outdoor benches. These resist rust. Standard wood screws work for indoor projects. The size of your wood pieces matters too. For main structural parts, use 2x4s or 2x6s. Seat and backrest slats can be 1x4s or 1x6s.
Gather your tools before you start. A miter saw or circular saw makes accurate cuts. A drill is essential for pre-drilling holes and driving screws. You also need a tape measure, a pencil, and a speed square for marking and ensuring square cuts. Safety glasses and ear protection are non-negotiable. Always wear them when operating power tools. Having clamps available helps hold pieces in place during assembly. This ensures a tight, secure fit. A sander prepares the wood for finishing. This makes the surface smooth and ready for stain or paint.
Step-by-Step Construction of Your Wood Bench Base
Building the base for your wood bench with back is the first major assembly step. Accuracy here ensures a stable, strong bench. Begin by cutting all your leg pieces to the exact same length. For a typical bench, aim for legs around 17-18 inches tall. You will need four legs. Next, cut the side rails. These connect the front and back legs. You will need four of these, two for each side of the bench. Their length determines the depth of your bench.
Now, assemble the side frames. Attach two side rails between two legs, forming an “H” shape. Use two screws at each joint for strength. Make sure your corners are square. A speed square helps check this. Repeat for the other side. You now have two identical side frames. These will form the ends of your bench. I like to use wood glue in addition to screws for extra strength. This creates a very durable joint.
After building the side frames, cut the front and back rails. These pieces connect the two side frames. Their length defines the total width of your bench. A common width is around 48 inches. Attach these long rails to the top front and back of your assembled side frames. This creates a sturdy rectangular box. Pre-drill holes to prevent wood from splitting. Use appropriate screws for all connections. This forms the main support structure of your wood bench with back. Ensure all connections are tight and secure. This base provides a strong foundation for the seat and backrest. If you are building a bench that will sit against a wall, some of these base principles apply, but you might only need front legs or different support for the back. You can find more specific advice on projects like how to build a bench seat against a wall.
Attaching the Seat and Backrest Slats
Once your bench base is solid, it is time to add the seat and backrest. These parts provide comfort and define the bench’s purpose. Start with the seat slats. Cut several pieces of wood to the desired length. These pieces will span the width of your bench. For a 48-inch wide bench, your slats should be 48 inches long.
Space the slats evenly across the top of the bench frame. Leave small gaps between them for drainage, especially for outdoor benches. About 1/4 to 1/2 inch is a good spacing. Attach each slat using two screws at each end, screwing into the top rails of the base. Ensure the slats are flush with the frame or slightly overhang, depending on your design. I always make sure to countersink the screws. This hides the screw heads and prevents snags.
Next, focus on the backrest. The backrest supports are key for comfort. You will need two upright pieces that extend from the back of the seat frame. Cut these supports at an angle at the top for the backrest slats to sit against. The angle should provide a comfortable recline, typically around 10-15 degrees from vertical. Attach these supports securely to the back of the bench frame, using strong screws or bolts. For similar projects, such as building a kitchen table bench, the principles of seat and backrest construction remain important. You can explore ideas for how to build a bench seat for kitchen table.
Finally, attach the backrest slats. Cut these slats to the same length as your seat slats. Space them evenly along the backrest supports. Attach them with screws, ensuring they are level and secure. You can place the top slat a bit higher for extra back support. This completes the main structure of your wood bench with back, making it ready for finishing.
Finishing and Protecting Your Wood Bench
Finishing your wood bench with back is crucial for its longevity and appearance. It protects the wood from elements and daily wear. Start by sanding every surface of your bench. Begin with a coarser grit sandpaper (e.g., 80 or 100 grit) to smooth out any rough spots or imperfections. Then, move to a finer grit (e.g., 150 or 220 grit) for a silky-smooth finish. Proper sanding prepares the wood to absorb stain or paint evenly. You can learn more about preparing wood for this step by reading about how to clean wood before staining.
After sanding, wipe down the entire bench to remove all dust. You can use a tack cloth or a damp rag. Let the wood dry completely. Now, apply your chosen finish. For outdoor benches, I highly recommend a high-quality outdoor stain and sealant, or an exterior paint. These products offer excellent protection against UV rays, moisture, and mildew. Apply the finish according to the manufacturer’s instructions. Often, this involves multiple thin coats. Let each coat dry fully before applying the next. For an indoor bench, you can use interior stain, paint, or a clear polyurethane topcoat. This finish enhances the wood grain and protects it from spills and scratches.
Applying a finish is not just about looks; it is about preservation. A well-finished bench will stand up to the weather for many years. It prevents the wood from cracking, warping, or rotting. Take your time during this stage. A good finish makes all the difference in the durability of your custom wood bench with back. Ensure complete coverage on all surfaces. This includes the undersides and hidden areas where moisture might collect.
Customizing Your Wood Bench Design
Once you have the basic structure of your wood bench with back, you can personalize it. Customizing makes your bench truly unique. Think about adding armrests. Armrests increase comfort and provide a place to rest your arms. You can cut them from similar wood pieces and attach them to the top of the front legs. Ensure they are at a comfortable height. I often add a slight curve to the armrests for a more ergonomic feel.
Consider different styles for the backrest. Instead of simple vertical slats, you could create a crisscross pattern. You might also design a solid back panel. Carving simple designs into the wood also adds character. For instance, I once carved an initial into the top slat of a bench for a friend. This personal touch makes the piece special.
You can also incorporate storage into your bench. A hinged seat top can reveal a storage compartment underneath. This is great for storing outdoor cushions or garden tools. Built-in storage adds functionality without taking up extra space. You could also add small shelves on the ends of the bench for drinks or books. These additions can make your bench more useful. Experiment with different wood stains or paint colors. A bright color can make your bench a focal point in the garden. A natural stain lets the wood grain shine through. The finishing touches, like decorative hardware or cushions, also change the look. These small details can significantly impact the final appearance and feel of your wood bench with back.
Maintenance and Longevity for Your Wood Bench
Proper maintenance ensures your wood bench with back lasts for many years. Regular care keeps it looking new and prevents decay. For outdoor benches, cleaning is vital. Dust, dirt, and pollen can accumulate on the surface. Use a soft brush or cloth to wipe down the bench regularly. For deeper cleaning, mix mild soap with water. Scrub the bench gently with a sponge or soft brush. Rinse thoroughly with clean water. Do not use high-pressure washers on wood. They can damage the wood fibers. When dealing with stains on your wood bench, quick action helps prevent them from setting. You can find helpful tips on how to clean stains on wood to address specific spots.
Inspect your bench annually for signs of wear. Check for loose screws or bolts. Tighten them as needed. Look for cracks or splinters in the wood. Sand these down and reapply a small amount of finish to protect the exposed area. The finish itself will wear over time, especially outdoors. Reapply your stain or sealant every 2-3 years, or as needed. This protects the wood from moisture and UV damage. You can get more information on general outdoor wood care by looking at guides like how to clean outdoor wood furniture.
During winter months, consider moving outdoor benches indoors or covering them. This protects them from harsh weather conditions like snow and ice. Even with weather-resistant wood, extreme cold and moisture can cause damage over time. Proper storage or covering prolongs the life of your wood bench with back. A little effort in maintenance goes a long way. It ensures your custom-built bench remains a beautiful and functional piece for your home for decades.
Frequently Asked Questions
How long does it typically take to build a wood bench with a back?
Building a wood bench with a back usually takes one to two days for a beginner. This includes time for cutting, assembly, and initial finishing. More experienced woodworkers might complete it in a single day. Drying time for finishes will add extra days before the bench is ready for use.
What type of wood is best for an outdoor bench with a back?
For outdoor benches, weather-resistant woods are best. Cedar, redwood, and pressure-treated pine are excellent choices. They naturally resist rot and insect damage. Teak is another good option, known for its durability and beautiful aging process, but it is more expensive.
Do I need special tools to build a wood bench?
You do not need many special tools. A miter saw or circular saw, an electric drill, a tape measure, and a speed square are essential. These tools help with accurate cutting and assembly. Basic hand tools like a hammer, clamps, and sandpaper are also very useful.
How can I make my wood bench more comfortable?
To increase comfort, consider adding a slight recline to the backrest. Use wide slats for both the seat and backrest to distribute weight better. You can also add outdoor cushions or pillows. Sanding all surfaces smooth prevents splinters and makes sitting more pleasant.
How often should I re-seal an outdoor wood bench?
Re-seal your outdoor wood bench every 2 to 3 years. This frequency can vary based on your climate and the type of finish used. Inspect the bench annually for signs of wear, such as fading or peeling. Reapply the sealant sooner if needed to ensure continuous protection.
Can I use pallets to build a wood bench with a back?
Yes, you can use pallets to build a wood bench with a back. Pallets offer a cost-effective and rustic option. However, ensure the pallets are heat-treated (HT stamped) and free from chemical treatments. Disassemble them carefully and sand the wood extensively before use.
Conclusion
Building your own wood bench with back is a fulfilling project. You gain a custom piece of furniture perfectly suited to your space. This guide covered everything from planning your design to the final protective finish. You now understand the steps for selecting materials, using essential tools, and assembling your bench. Remember that careful planning and precise cuts are the foundation of a sturdy bench. Applying a good finish ensures its beauty and durability for years to come.
Your new wood bench with back will provide a comfortable spot for relaxation or an inviting entryway seat. It adds character and functionality to any area. Embrace the satisfaction of creating something with your own hands. Start your woodworking project today and enjoy the comfort and style of your handmade wood bench. It is a rewarding endeavor that enhances your home and offers lasting enjoyment.
- wood bench
- DIY furniture
- backyard bench
- woodworking
- outdoor furniture
- garden bench
- how-to build


