· Todd Martin · DIY Projects · 15 min read
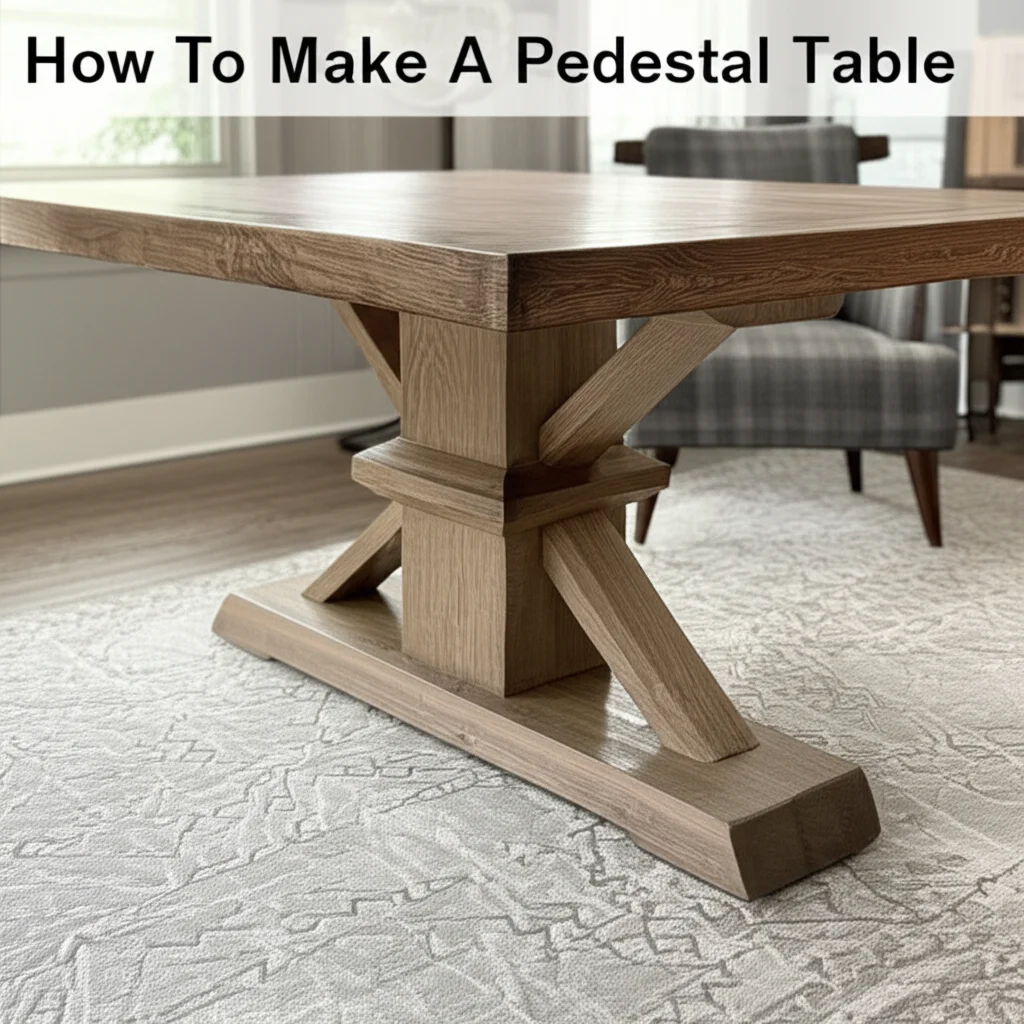
How To Make A Pedestal Table
Craft Your Own Pedestal Table: A Complete Guide
Creating your own furniture is a rewarding experience. A pedestal table offers unique style and stability compared to traditional four-legged tables. I often admire the elegance a pedestal design brings to any room. Building one yourself lets you customize it perfectly for your space.
This article guides you through the process to make a pedestal table from start to finish. We will cover design choices, necessary tools, and detailed construction steps. You will learn to craft both the sturdy base and the beautiful tabletop. Get ready to add a custom piece of furniture to your home.
Takeaway
- Design for stability and aesthetics: Plan your pedestal table’s dimensions, materials, and style carefully.
- Gather the right tools: Essential woodworking tools ensure precise cuts and strong joints.
- Construct a sturdy base: The core of your pedestal table relies on a robust central column and stable feet.
- Craft and attach the tabletop: Securely join your chosen tabletop material to the completed base.
- Finish with care: Proper sanding, staining, and sealing protect your table and enhance its beauty.
To make a pedestal table, you need to design the top and base, gather materials and tools, construct the stable central pedestal, attach a durable tabletop, and then apply a protective finish. This DIY project allows for full customization to fit any home decor style.
Why Build a Pedestal Table? Benefits and Appeal
Building a pedestal table provides many benefits over buying a mass-produced one. It allows for complete personalization. You choose the wood, the finish, and the exact dimensions. This means your table will fit your home perfectly.
A pedestal table also offers more legroom. There are no individual legs to get in the way. This design makes seating more comfortable around the table. It is especially useful in smaller spaces.
The design itself is often very elegant. Pedestal tables often become focal points in a room. They can look classic, modern, or rustic depending on your chosen style. I find they add a touch of sophistication. This project is a great way to express your creativity.
Pedestal tables are incredibly stable. Their central base distributes weight evenly. This prevents wobbling, even with heavy use. It provides a reliable surface for dining or display. This unique stability is a key advantage.
Designing Your Pedestal Table: Style and Dimensions
Designing your pedestal table is the first and most creative step. Consider where the table will go and how you will use it. Will it be a dining table, a side table, or an entryway piece? This determines its ideal size and shape. Think about the overall style of your home.
For a classic look, you might choose a turned wood pedestal. A modern design might feature a clean, minimalist column. Industrial styles often use metal elements in the base. The tabletop shape also matters. Round, square, or oval tops all create different aesthetics. I prefer round tables for their natural flow in a room.
Table Dimensions Considerations:
- Height: Standard dining tables are 29-30 inches tall. Coffee tables are usually 16-18 inches. Consider the chairs you will use with the table.
- Tabletop Diameter/Size: Allow enough space per person for dining. A 48-inch round top seats 4-6 people comfortably. A smaller top works for accent tables.
- Base Dimensions: The base must be proportionate to the top. A wider base provides more stability. The footprint of the base should not exceed the tabletop’s edge to avoid tripping hazards. The base itself should be sturdy enough to support the entire top.
Material Selection:
- Wood: Hardwoods like oak, maple, or walnut offer durability and beautiful grain. Pine is more affordable and easier to work with. Reclaimed wood can add character.
- Plywood/MDF: These can be used for the tabletop or as core material for the base, then veneered or painted. Plywood provides good stability.
- Finish: Decide on paint, stain, or clear coat early. This affects the wood choice. A dark stain gives a rich, traditional feel. Light paint can brighten a room.
Careful planning saves time and prevents mistakes later. Sketching your design helps visualize the final product. It ensures all components fit together properly. This planning phase is crucial for a successful build.
Gathering Materials and Essential Tools
Before you start cutting, ensure you have all necessary materials and tools. Having everything ready saves trips to the store. It makes the building process smoother and more efficient. I always create a checklist to avoid missing anything.
Materials Checklist:
- Wood for Tabletop: Plywood, solid wood planks, or a pre-made tabletop. Consider the desired thickness.
- Wood for Pedestal Base: Solid wood blocks or lumber for the column, and wider pieces for the top and bottom support plates. You might also need smaller pieces for decorative feet or shaping elements. For a very strong base, consider using a solid piece for the column or laminating several pieces together.
- Wood Glue: High-quality wood glue for strong joints.
- Screws/Bolts: Appropriate length and type for attaching components, especially the base to the top. Consider using lag screws or threaded inserts for a secure connection.
- Sandpaper: Various grits (from coarse to fine) for smooth finishing.
- Wood Filler: To fill any gaps or imperfections.
- Finish: Stain, paint, polyurethane, or other protective topcoat.
- Rags/Brushes: For applying finishes.
Essential Tools:
- Measuring Tape and Pencil: For accurate measurements and marking.
- Safety Glasses and Hearing Protection: Always prioritize safety in the workshop.
- Circular Saw or Table Saw: For cutting large pieces of wood to size. A circular saw is versatile for many cuts.
- Miter Saw: For precise angle cuts, especially useful for base components.
- Drill/Driver: For pre-drilling holes and driving screws.
- Router (Optional but Recommended): For shaping edges, creating dados, or hollowing out sections. You can use it to create decorative edges on your tabletop or base plates.
- Wood Clamps: Essential for holding pieces securely while glue dries.
- Orbital Sander: For efficient and smooth sanding.
- Level: To ensure your table is flat and stable.
- Square: For checking right angles.
Having the right tools makes a significant difference in the quality and ease of your build. Do not rush this preparation step. A well-prepared workspace sets you up for success.
Constructing the Pedestal Base: Stability and Form
Building the pedestal base is the most critical part of the project. A strong base ensures your table’s stability. The base typically consists of a central column, a top plate, and a bottom foot structure. I enjoy shaping the column for a unique look.
Steps for Building the Pedestal Base:
Prepare the Central Column:
- Cut your chosen lumber for the column to the desired height.
- If using multiple pieces, laminate them together with wood glue. Clamp them tightly and let them dry completely. This creates a solid block for the column.
- Shape the column if desired. You can use a router, a lathe (if available), or hand tools to create tapers, curves, or decorative elements. For instance, you might want to learn how to make a tapered table leg for inspiration on shaping.
- Ensure the column is perfectly plumb and smooth.
Cut the Top and Bottom Plates:
- These are often square or round pieces of wood. They provide attachment points for the column and the tabletop.
- The top plate should be slightly smaller than the tabletop. The bottom plate, or “foot,” should be wider than the column base for stability.
- Cut these pieces to your planned dimensions. For a circular base, a cylinder table base guide might be helpful for ideas.
Assemble the Foot Structure (if applicable):
- Many pedestal bases have an X-shape or four-legged foot design. Cut these support pieces.
- Use mortise and tenon joints, dados, or sturdy lap joints for strong connections.
- Glue and screw these pieces together securely. Ensure the feet are level and flat. This provides a wide, stable foundation.
Attach the Column to the Foot:
- Center the column on the finished foot structure.
- Drill pilot holes through the foot and into the column.
- Use long, strong screws or lag bolts to firmly attach the column. Add wood glue for extra strength. Clamping helps keep everything aligned.
Attach the Top Plate to the Column:
- Center the top plate on the column.
- Drill pilot holes from the top plate into the column.
- Secure with screws and wood glue. Ensure this connection is very strong, as it will support the entire tabletop. This plate is where the tabletop will eventually attach.
Double-check all connections for strength and stability. The base needs to support the weight of the tabletop and anything placed on it. Proper alignment at each step prevents a wobbly table.
Crafting and Attaching the Tabletop
The tabletop is the most visible part of your pedestal table. It needs to be well-constructed and beautiful. Your choice of material affects the table’s final look and durability. I love the warmth of a solid wood top.
Steps for Crafting the Tabletop:
Select and Prepare Tabletop Material:
- If using solid wood planks, join them together using biscuits, dowels, or tongue-and-groove joints. Apply wood glue to all mating surfaces. Clamp the planks tightly and allow the glue to dry for at least 24 hours.
- If using plywood or a pre-made top, ensure it is cut to your desired shape and size. For outdoor use, consider learning how to make an outdoor table top for specific material considerations.
- Once the glue is dry, scrape off any excess glue squeeze-out.
Shape and Finish Edges:
- Use a router with a decorative bit to create an appealing edge profile. A round-over bit gives a soft edge, while a chamfer adds a crisp line. You can also simply sand the edges smooth.
- Ensure all edges are smooth to the touch. This prevents splinters and improves the aesthetic.
Sand the Tabletop:
- Begin sanding with a coarser grit sandpaper (e.g., 80 or 100 grit) to remove any major imperfections or glue residue.
- Progress through finer grits (120, 150, 180, 220 grit) until the surface is incredibly smooth. Sand with the grain of the wood.
- Wipe away all dust between grits with a tack cloth or damp rag. This step is crucial for a professional finish.
Attaching the Tabletop to the Base:
Center the Tabletop:
- Carefully center the finished tabletop upside down on a soft surface.
- Place the pedestal base upside down on the center of the tabletop’s top plate. Ensure it is perfectly centered and aligned. Use a measuring tape to check distances from the edges.
Mark and Drill Pilot Holes:
- Mark the locations for screws or bolts. You will typically drill through the top plate of the base into the underside of the tabletop. Use at least 4-6 evenly spaced attachment points.
- Drill pilot holes through the top plate and into the tabletop. Ensure the pilot holes are the correct size for your screws to prevent splitting the wood.
Secure the Tabletop:
- Apply a small amount of wood glue to the top surface of the pedestal base’s top plate where it meets the tabletop.
- Drive screws through the pre-drilled pilot holes in the top plate and into the tabletop. For extra strong connections, consider using threaded inserts in the tabletop and machine screws through the base.
- Tighten the screws firmly, but do not overtighten, which can strip the wood.
This secure attachment ensures your table will remain stable for years to come. Take your time to align everything perfectly.
Assembly and Finishing Touches
After assembling the main components, it is time for the final touches. These steps protect your table and enhance its beauty. A well-applied finish makes all the difference. I always enjoy seeing the wood grain pop after the first coat of stain.
Final Sanding:
- Even after assembly, give the entire table a final light sanding. Use a fine-grit sandpaper (220 grit or higher). This removes any last imperfections or fingerprints. It prepares the surface for the finish.
- Wipe down the entire table with a tack cloth. Remove all dust particles. A dust-free surface is essential for a smooth finish.
Applying the Finish:
Stain or Paint:
- If staining, apply an even coat of your chosen wood stain with a rag or brush. Follow the wood grain.
- Wipe off any excess stain after the recommended time. This prevents a blotchy appearance. Allow the stain to dry completely, usually 12-24 hours.
- If painting, apply a primer first for better adhesion and durability. Then apply multiple thin coats of paint. Lightly sand between coats for a smooth finish.
Protective Topcoat:
- Once the stain or paint is dry, apply a protective topcoat. Options include polyurethane, lacquer, shellac, or tung oil. Polyurethane is very durable for tabletops.
- Apply thin, even coats following the product instructions. Use a high-quality brush or sprayer.
- Lightly sand with very fine sandpaper (320-400 grit) between coats. This removes any dust nibs and ensures a smooth surface.
- Wipe with a tack cloth after each sanding. Apply at least 2-3 coats for good protection. More coats mean greater durability. Allow each coat to dry fully before sanding or applying the next.
Buffing and Curing:
- After the final topcoat dries, you can buff the surface if desired. Use very fine steel wool or a non-abrasive pad. This creates a smoother feel.
- Allow the finish to fully cure before heavy use. This can take several days or even weeks depending on the product. Refer to the product’s instructions for curing times. A fully cured finish is more resistant to scratches and spills.
These finishing steps protect your hard work. They ensure your custom pedestal table will last for many years.
Maintaining Your Pedestal Table for Lasting Beauty
Proper care and maintenance ensure your custom pedestal table remains beautiful for years. Wood furniture needs regular attention. I always make sure to clean my wooden tables gently. This helps prevent damage and preserves the finish.
Regular Cleaning:
- Dust your table regularly with a soft, dry cloth. This prevents dust buildup and scratches.
- For spills, wipe them immediately with a damp cloth. Avoid harsh chemicals or abrasive cleaners. These can strip the finish.
- For deeper cleaning, use a mild soap solution and a soft cloth. Dry the table thoroughly afterward. Remember, you can always learn how to clean a wood table for more detailed tips.
Protecting the Surface:
- Use coasters for drinks. This prevents water rings and condensation marks.
- Place placemats under dishes, especially hot ones. Heat can damage the finish.
- Use felt pads under decorative items or lamps. This prevents scratches when items are moved.
- Avoid placing the table in direct sunlight for extended periods. UV rays can fade the finish and cause wood to warp. Rotate the table if possible to ensure even exposure.
Addressing Damage:
- Scratches: Minor scratches can often be buffed out with furniture polish or a scratch repair kit. Deeper scratches might require more intensive repair, such as light sanding and re-finishing the affected area.
- Water Rings: For stubborn water rings, some gentle remedies exist. You can try rubbing mayonnaise or petroleum jelly on the spot overnight. Then wipe it off the next day. Always test on an inconspicuous area first.
- Warping/Cracking: Maintain consistent humidity levels in your home. Extreme changes in temperature and humidity can cause wood to expand, contract, warp, or crack. A humidifier or dehumidifier can help.
Re-finishing:
- Over time, the protective finish may wear down. When this happens, consider re-applying a topcoat.
- Lightly sand the existing finish to create a good bonding surface. Clean thoroughly. Then apply new coats of polyurethane or your chosen finish. This can revitalize your table and offer renewed protection.
- If the damage is extensive, you might need to strip the old finish completely and re-finish the entire table.
Consistent care keeps your handmade pedestal table looking its best. It will remain a cherished piece of furniture in your home.
Frequently Asked Questions
Q1: How much does it cost to build a pedestal table compared to buying one? Building a pedestal table can be significantly more cost-effective than buying a new one, especially if you have some tools already. The cost primarily depends on the type of wood you choose and the complexity of your design. Buying lumber and supplies usually costs less than a ready-made, high-quality furniture piece.
Q2: What type of wood is best for a durable pedestal table? Hardwoods like oak, maple, walnut, or cherry are excellent choices for a durable pedestal table. They are dense, resistant to dents, and hold up well to daily use. While more expensive, they provide superior longevity and beauty. Pine or poplar are more budget-friendly options but are softer and more prone to wear.
Q3: Can I build a pedestal table without advanced woodworking tools? Yes, you can build a basic pedestal table with common tools like a circular saw, drill, sandpaper, and clamps. A miter saw makes cuts more precise, and a router adds decorative elements. You can simplify the design to fit your available tools. Start with simpler shapes for the base and top.
Q4: How do I ensure my pedestal table is stable and does not wobble? Stability comes from a wide, sturdy base and strong, well-joined components. Ensure your bottom foot structure has a wide footprint. Use strong wood glue and appropriate screws or bolts for all connections. Accurately cut and level components prevent wobbling. Proper clamping during glue-up also ensures strong joints.
Q5: What are common tabletop shapes for pedestal tables? Round and oval tabletops are very common for pedestal tables. They offer flexible seating and enhance the circular flow of the pedestal base. Square and rectangular tops are also possible, especially for larger dining tables or console tables. The shape you choose impacts the table’s overall aesthetic and how it fits into your room.
Q6: How long does it take to build a pedestal table? The time to build a pedestal table varies greatly. It depends on your woodworking experience, the complexity of the design, and the drying times for glue and finish. A simple design might take a few weekends. A more elaborate table with decorative elements and multiple finish coats could take several weeks.
Conclusion
Building your own pedestal table is a fulfilling project. You create a custom piece of furniture tailored to your exact needs and style. We covered everything from initial design ideas to final finishing touches. You now have the knowledge to make a pedestal table that will last for years.
This DIY endeavor allows for immense personalization. You can choose any wood, shape, and finish to match your home. The result is a unique, stable, and beautiful table. Take pride in crafting a functional work of art. Begin your project today and transform your living space with a handmade pedestal table.
- pedestal table DIY
- woodworking
- home decor
- table building
- DIY furniture
- custom table

Todd Martin
Senior Writer
With over 15 years of experience in home renovation and design, I started HEG to share what I’ve learned with homeowners who want to create spaces that are both beautiful and functional. I’ve always believed in a hands-on approach, and over the years, I’ve picked up practical solutions that actually work. Through HEG, I aim to make home improvement more approachable, sharing real tips that help you create a home you truly love.