· Todd Martin · DIY Projects · 21 min read
How To Frame A Medicine Cabinet Mirror
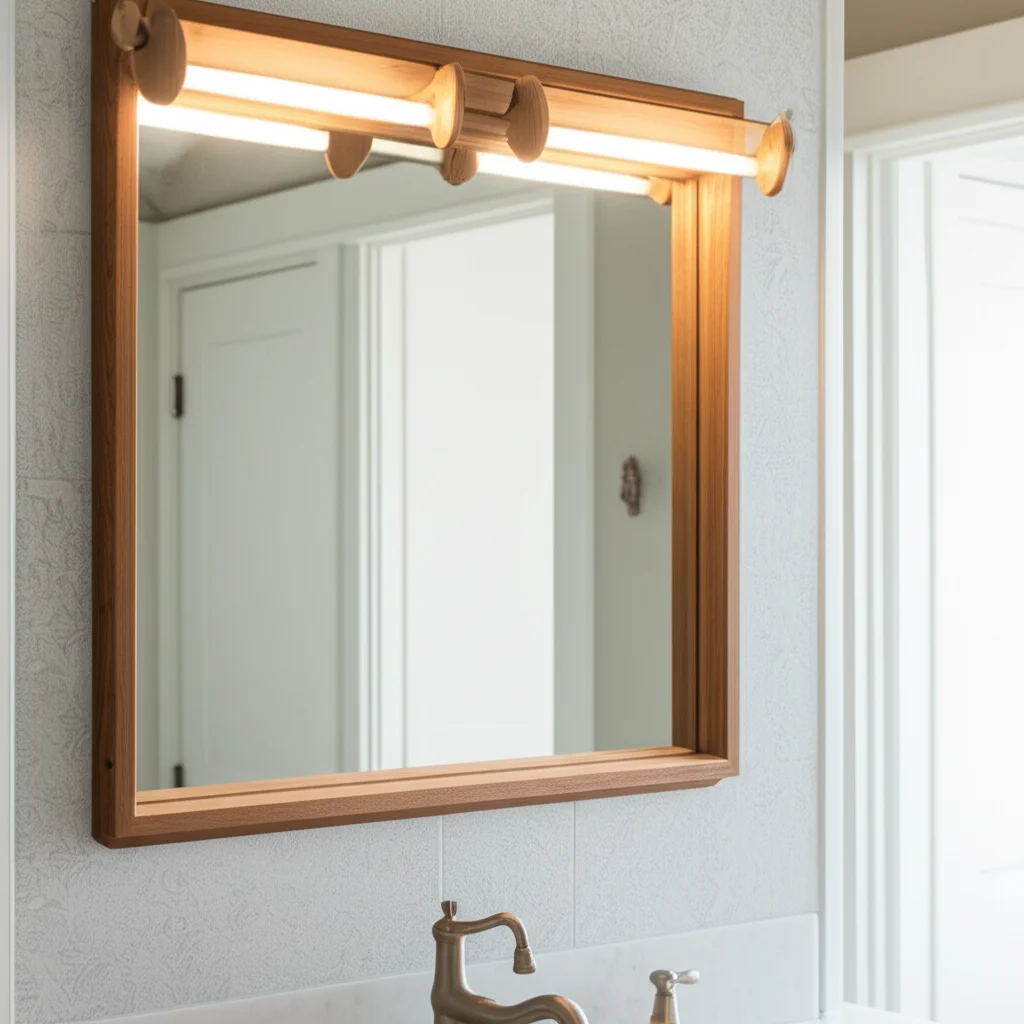
Frame Your Medicine Cabinet Mirror for a Fresh Look
Have you ever looked at your bathroom medicine cabinet and felt it lacked a certain something? Many standard medicine cabinet mirrors look plain. They often blend into the wall without making a statement. Adding a frame can completely change this. It transforms a basic utility item into a decorative feature.
Learning how to frame a medicine cabinet mirror is a smart way to update your bathroom. This project enhances your space without a full remodel. It adds visual weight and character to your vanity area. Framing creates a more finished and high-end appearance. This guide walks you through every step. You will learn about choosing materials, preparing the surface, and attaching the frame. Get ready to give your bathroom a beautiful, custom touch.
Takeaway
Transform your medicine cabinet mirror easily with a custom frame. This DIY project adds style and value.
- Select the right frame material to match your bathroom design.
- Measure precisely for a perfect fit.
- Clean the mirror and surrounding area thoroughly before starting.
- Apply the frame securely using appropriate adhesives and fasteners.
- Enjoy a refreshed, custom look for your bathroom.
Clear, Concise Answer
To frame a medicine cabinet mirror, first measure the mirror’s dimensions accurately. Choose a lightweight frame material. Prepare the mirror surface by cleaning it well. Then, cut the frame pieces to size with precise mitered corners. Finally, attach the frame securely to the mirror or cabinet door using strong adhesive or small fasteners, ensuring a neat finish.
Why Frame Your Medicine Cabinet Mirror? Elevate Your Bathroom Style
Updating a bathroom often involves large, expensive projects. You might think about new tiles or a vanity replacement. However, a small change can make a big impact. Framing your medicine cabinet mirror offers a cost-effective way to refresh your bathroom. It adds a touch of elegance and personal style. This simple modification can make a dull space feel custom and inviting.
A framed mirror creates a focal point. It draws the eye and anchors the vanity area. This helps define the space and makes the room feel more intentional. Without a frame, the mirror often looks like an afterthought. It can feel unfinished and bare. A frame provides structure and visual weight. It transforms a functional item into a design element.
Beyond aesthetics, framing can hide imperfections. Old medicine cabinets might have chipped edges or faded mirror silvering. A new frame covers these flaws. It gives the illusion of a brand-new, high-quality mirror. This saves you money compared to replacing the entire unit. The process is also manageable for most DIY enthusiasts. You do not need specialized skills for this project.
The added texture and color from a frame enhance your decor. You can choose wood, metal, or composite materials. Each material offers different looks. A rustic wood frame brings warmth. A sleek metal frame offers a modern touch. You can paint or stain the frame to match any color scheme. This customization allows you to create a cohesive design. It ties together other elements in your bathroom. This small detail truly completes the room’s design.
Choosing the Right Frame Style and Materials for Your Bathroom
Selecting the correct frame style and material is crucial. It impacts the overall look of your bathroom. Think about your existing decor. Do you have a traditional, modern, farmhouse, or minimalist style? The frame should complement these elements. A mismatched frame can disrupt your bathroom’s harmony.
Consider the material. Wood frames offer warmth and classic appeal. They come in many finishes, from natural stains to painted looks. You can match them to existing cabinetry or trim. MDF (medium-density fiberboard) is a cost-effective alternative to solid wood. It takes paint well and resists warping. However, it is less water-resistant than solid wood.
Metal frames provide a sleek, contemporary feel. Options include brushed nickel, chrome, or matte black. These finishes often match faucet fixtures. They give a very cohesive and modern look. However, metal frames can be heavier. They might require different attachment methods. Plastic or PVC frames are lightweight and water-resistant. They are excellent for humid bathroom environments. These frames are usually budget-friendly and easy to cut.
Think about the frame profile. A thin, simple profile suits modern or minimalist bathrooms. A wider, more ornate profile fits traditional or opulent designs. The depth of the frame also matters. If your medicine cabinet door is recessed, a flat frame works well. If it’s flush, a deeper frame might be suitable. Ensure the frame does not obstruct the door’s opening or closing. It should not hit walls or other fixtures. Hold up samples to visualize the final result.
Consider the mirror’s edges. Some medicine cabinet mirrors have beveled edges. A frame can enhance these details. It can also hide them if they are damaged. The frame should not cover too much of the mirror surface. You still need full visibility for daily use. Take your time with this selection. The right choice makes a significant difference.
Essential Tools and Materials for a Seamless Framing Project
Before you begin framing your medicine cabinet mirror, gather all necessary tools and materials. Having everything ready streamlines the process. It prevents interruptions and makes the project go smoothly. Missing one item can halt your progress. A well-prepared workspace is an efficient one.
Here is a list of what you will need:
- Frame Material: This is your chosen trim. Options include wood molding, PVC trim, or pre-made mirror frame kits. Measure the perimeter of your mirror. Add extra length for mistakes and miter cuts. Always buy a little more than you think you need.
- Measuring Tape: A sturdy metal tape measure is essential for accurate dimensions. Precision is key for perfect miter cuts.
- Pencil: For marking cut lines on your frame material.
- Miter Box and Saw: A miter box helps you make accurate 45-degree angle cuts. A hand saw or power miter saw works for cutting the frame pieces. If you use a hand saw, ensure the blade is sharp.
- Wood Glue or Strong Adhesive: Choose a high-quality adhesive designed for mirrors or the specific frame material. Construction adhesive or mirror mastic works well. Ensure it is moisture-resistant for bathroom use.
- Painter’s Tape or Clamps: These hold the frame pieces in place while the adhesive dries. Painter’s tape is good for light frames. Small clamps can offer more pressure for heavier pieces.
- Finishing Nails or Small Screws (Optional): For added security, especially with heavier wood frames. Use very small nails or screws. They should not penetrate the mirror or cabinet interior.
- Drill and Drill Bits (Optional): If using screws. Choose bits slightly smaller than your screw diameter.
- Caulk Gun and Paintable Caulk: For sealing gaps between the frame and the mirror or wall. This creates a finished look.
- Wood Filler (for wood frames): To fill nail holes or small gaps.
- Sandpaper: Fine-grit sandpaper (180-220 grit) smooths cuts and prepares wood for finishing.
- Primer, Paint, or Stain: To finish your frame if it is not pre-finished.
- Clean Cloths and Mirror Cleaner: For preparing the mirror surface. You want a clean, streak-free surface for adhesive application. Learn how to clean your mirror properly before starting.
- Safety Glasses: Protect your eyes from sawdust or flying debris.
- Gloves: Protect your hands from adhesives or paint.
Gathering these items beforehand saves time. It ensures a smooth and successful framing project.
Preparing Your Medicine Cabinet for Framing: Essential Steps
Proper preparation is vital for a lasting and beautiful result. Do not rush this stage. A clean, well-measured surface ensures the frame adheres correctly. This step prevents future issues like bubbling or unevenness. Your goal is to create a perfect canvas for the new frame.
First, clean the mirror surface thoroughly. Dust, grime, and fingerprints will prevent adhesive from sticking well. Use a good quality mirror cleaner and a microfiber cloth. Spray the cleaner directly onto the cloth, not the mirror. This avoids drips running into the cabinet or down the wall. Wipe the mirror until it is completely spotless and streak-free. Pay close attention to the edges where the frame will sit. You can also take this opportunity to clean the entire cabinet. A clean cabinet and mirror provide the best starting point.
Next, measure the mirror dimensions precisely. Use your metal measuring tape. Measure the height and width of the mirror surface. Measure at least twice to ensure accuracy. Write down your measurements clearly. It helps to draw a simple diagram of your mirror with the dimensions. If your medicine cabinet door has a raised lip or a recessed mirror, account for this. The frame should sit flush or slightly proud of the mirror surface. Ensure the frame will not interfere with the door’s hinges or opening mechanism.
Determine how the frame will attach. Will it attach directly to the mirror glass? Or will it attach to the cabinet door frame around the mirror? Most DIY frames attach directly to the mirror glass with adhesive. If your mirror is very small or has a very thin edge, attaching to the cabinet door might be better. This adds stability. Measure carefully around any hinges or hardware. The frame should fit around them neatly.
Consider the weight of your chosen frame material. Heavier frames may require stronger adhesive or additional mechanical fasteners. If using a wood frame, ensure the cabinet door can support the added weight. Light wood or PVC frames are often best for medicine cabinets. They minimize stress on hinges. Proper preparation ensures your new mirror frame looks professional.
Step-by-Step Guide: Attaching the Frame to Your Mirror
Now, let’s get to the exciting part: attaching the frame. This process requires patience and precision. Take your time to ensure each step is done correctly. A well-attached frame will look professional and last for years.
1. Cut the Frame Pieces: Place your chosen frame material into the miter box. Use your measurements from the preparation step. Cut the first piece to the correct length for one side (e.g., the top). Make sure to cut a 45-degree angle at each end. The long point of the angle should be on the outer edge of the frame. This creates a perfect corner. Cut the remaining three pieces in the same manner. Ensure opposing pieces are identical in length. Dry-fit the four pieces around your mirror. Check that the corners meet perfectly. Make any minor adjustments now. Sand the cut ends lightly to remove any burrs.
2. Finish the Frame Pieces (if needed): If your frame material is unfinished wood, this is the time to paint or stain it. Apply primer first, if necessary. Paint or stain all sides of each frame piece. Let them dry completely according to product instructions. This prevents messes later and ensures even coverage.
3. Apply Adhesive: Lay your medicine cabinet door flat on a protected surface. Apply a continuous bead of strong adhesive or mirror mastic to the back of one frame piece. Place the bead about 1/2 inch from the outer edge. Do not put it too close to the inner edge. You do not want it to squeeze out onto the mirror. Be careful not to use too much adhesive.
4. Attach the First Piece: Carefully position the first frame piece onto the mirror. Align it perfectly with the mirror’s edge. Press down firmly along its entire length. If using painter’s tape, secure this piece to the mirror or cabinet door. Ensure it is straight and level.
5. Attach Remaining Pieces: Apply adhesive to the next frame piece. Fit its mitered end tightly against the first piece’s mitered end. Align it with the mirror’s edge. Press firmly. Continue this process for all four pieces. As you attach each piece, check that the corners are tight and flush. Use painter’s tape or clamps to hold all pieces in place. Ensure they do not shift while the adhesive dries.
6. Add Optional Fasteners: For added security, especially with heavier frames, you can use small finishing nails or screws. Drill small pilot holes through the frame material. This prevents splitting the wood. Carefully drive nails or screws into the cabinet door frame, not the mirror glass. Ensure they are short enough not to penetrate the cabinet interior. Countersink the nail or screw heads.
7. Allow Adhesive to Cure: Leave the painter’s tape or clamps in place for the full curing time recommended by the adhesive manufacturer. This can range from a few hours to 24 hours. Do not rush this step. Proper curing ensures a strong bond.
8. Finishing Touches: Once the adhesive is fully cured, remove all tape or clamps. Fill any nail holes or small gaps with wood filler. Let it dry, then sand smooth. Apply paintable caulk along the inner seam where the frame meets the mirror. This creates a seamless, professional look. It also prevents moisture from getting behind the frame. Smooth the caulk with a wet finger. Touch up any paint or stain as needed. Your framed medicine cabinet mirror is now complete.
Finishing Touches and Long-Term Maintenance for Your Framed Mirror
Once your frame is securely attached and the adhesive has cured, a few finishing touches will elevate its appearance. These steps ensure a polished look and protect your work for years to come. Do not skip these final details. They make a good DIY project look professional.
First, seal any gaps. Even with careful cutting, small gaps might appear where the frame meets the mirror or the cabinet door. Use a paintable caulk for this. Apply a thin bead along these seams. Smooth the caulk with a wet finger or a caulk tool. This fills the gaps. It creates a seamless transition. It also prevents moisture from seeping behind the frame, which is crucial in a humid bathroom. Let the caulk dry completely according to product instructions.
Next, touch up the finish. If you painted or stained your frame, you might have small smudges or areas needing more coverage. Use a small brush to apply touch-up paint or stain. Ensure the color matches perfectly. If you used wood filler for nail holes, paint over those areas too. Stand back and examine the frame from different angles. Make sure the finish is uniform and clean.
Consider adding protective measures. For wood frames, applying a clear sealant or polyurethane can offer extra moisture protection. This is especially important for bathroom environments. Choose a product that dries clear and is suitable for humid conditions. This extra layer protects the wood from steam and splashes. It extends the life of your frame.
Long-term maintenance is simple.
- Regular Cleaning: Clean your framed mirror regularly. Use a soft, damp cloth for the frame. Avoid abrasive cleaners on the frame material. For the mirror, use a non-ammonia based cleaner. Spray it onto a cloth first, then wipe the mirror. This prevents overspray on the frame.
- Check for Moisture: Periodically inspect the frame for any signs of moisture damage. Look for swelling, peeling paint, or mold. Address any issues promptly. Reapply caulk if you see cracks or gaps forming.
- Gentle Handling: When opening and closing the medicine cabinet door, do so gently. Avoid slamming the door. This prevents stress on the frame and adhesive.
- Avoid Harsh Chemicals: Do not use harsh bathroom cleaners near your framed mirror. Chemicals can damage the frame’s finish or the adhesive bond. Wipe up spills immediately.
By following these finishing touches and maintenance tips, your custom-framed medicine cabinet mirror will remain a beautiful and functional addition to your bathroom for many years.
Troubleshooting Common Challenges When Framing a Medicine Cabinet Mirror
Even with careful planning, DIY projects can present challenges. Framing a medicine cabinet mirror is generally straightforward, but issues can arise. Knowing how to troubleshoot common problems saves time and frustration. It helps you achieve a successful outcome.
1. Crooked Cuts or Uneven Corners: This is a frequent issue. If your miter cuts are not exactly 45 degrees, your corners will not meet perfectly.
- Solution: Re-cut the affected pieces. Double-check your miter saw or miter box settings. Ensure your material is firmly against the fence when cutting. Sometimes, a slight gap can be filled with wood filler and caulking after assembly. However, striving for perfect cuts initially is always best.
2. Adhesive Not Sticking or Frame Slipping: If the frame pieces are not holding, the surface might not be clean enough. Or, the adhesive may not be suitable.
- Solution: Ensure the mirror surface is completely clean and dry before applying adhesive. Use a strong, moisture-resistant adhesive specifically designed for mirrors or the frame material. If the frame slips during drying, use more painter’s tape or clamps. Ensure proper pressure is applied until the adhesive cures. You may need to reapply adhesive if the bond fails.
3. Frame Interferes with Door Operation: The framed door might rub against the wall, light fixture, or other cabinet doors.
- Solution: Before attaching the frame, always dry-fit all pieces and test the door’s full range of motion. If you find interference, you might need to choose a thinner frame profile. Or, you might need to adjust the cabinet hinges if possible. Sometimes, a slight shift in the cabinet’s installation can help. In some cases, you may need to trim a very small amount from the outer edge of the frame, but this can compromise the appearance.
4. Gaps Between Frame and Mirror: Small gaps can appear along the inside edge of the frame.
- Solution: Apply a thin bead of paintable caulk along this seam. Use a wet finger or a caulk tool to smooth it for a clean finish. This hides the gap and creates a seal.
5. Frame Too Heavy for Hinges: If your cabinet door sags or struggles to stay open after framing, the new weight might be too much.
- Solution: Consider using lighter frame materials next time. For an existing heavy frame, you might need to replace the cabinet hinges with heavier-duty versions. Ensure the screws holding the hinges are secure. If screw holes are stripped, you can learn how to fix stripped screw holes in wood cabinets.
6. Scratches on Mirror During Installation: Accidental scratches can happen when handling tools or frame pieces near the mirror.
- Solution: Always place a protective cloth over the mirror when working directly on it. Use painter’s tape along the mirror edge if you are cutting very close. Be extremely careful when positioning the frame.
By anticipating these issues, you can approach your framing project with confidence. Most problems have simple solutions. Remember, patience and attention to detail are your best tools.
Alternative Framing Ideas for Unique Medicine Cabinet Mirrors
While a traditional mitered frame is popular, many other creative ways exist to frame a medicine cabinet mirror. Thinking outside the box can lead to unique, personalized results. These alternatives offer different aesthetics and can suit various bathroom styles. They can also provide simpler installation methods.
One popular alternative is using peel-and-stick trim. This type of trim often comes with adhesive backing. It is a very easy and quick solution. You simply measure, cut, and press the trim onto the mirror. These trims are available in various styles, including metallic or wood-look finishes. They are excellent for renters or those seeking a temporary update. They are also very lightweight.
Another idea is to use decorative moulding or wall trim. Instead of directly framing the mirror, you can create a decorative border on the wall around the medicine cabinet. This method works well for flush-mounted cabinets. It gives the illusion of a larger, grander mirror. You can match the moulding to your existing baseboards or crown molding. This adds architectural detail to your bathroom. This is a good option if you have an unusual-sized mirror.
Consider mosaic tiles or decorative glass pieces. For a truly unique look, you can create a mosaic frame. Apply small tiles or glass pieces directly to the mirror or the cabinet door around the mirror. Use a strong adhesive suitable for glass. Grout the tiles for a finished look. This offers a vibrant and artistic touch. It allows for endless color and pattern combinations. This project can be more time-consuming. It offers a very custom result.
You can also create a fabric or rope frame. For a softer, more bohemian look, attach a thick, braided rope or a strip of fabric around the mirror. Use a strong fabric adhesive or hot glue. Ensure the material is moisture-resistant or treated for bathroom use. This adds texture and warmth. It is a very inexpensive option.
For a rustic or industrial feel, use reclaimed wood or metal strips. Old barn wood or distressed metal can create a striking frame. Ensure the material is clean and sealed to prevent moisture damage. These materials often have natural imperfections. These add to their charm. Always ensure the material is lightweight enough for the cabinet hinges. This approach adds character to your bathroom.
Explore options like mirror frame kits. Many companies sell pre-cut, pre-finished frame kits. These kits are designed to fit common mirror sizes. They often include adhesive or clips for easy installation. This takes the guesswork out of cutting and finishing. It is a convenient choice for beginners. Choosing an alternative method can provide a bespoke look for your medicine cabinet mirror. It allows for creative expression.
Enhancing Durability and Aesthetic Appeal: Advanced Tips
Once you have successfully framed your medicine cabinet mirror, you might want to consider advanced tips. These go beyond basic installation. They focus on improving the frame’s durability and visual appeal. They help ensure your custom frame lasts and truly stands out.
1. Reinforce Corner Joints: For wood frames, consider reinforcing the mitered corners. After cutting, apply a small amount of wood glue to each mitered joint before assembly. Once the frame is assembled and dry, you can use small brad nails or a splined joint. A splined joint involves cutting a thin slot into the corner and inserting a small piece of wood. This significantly strengthens the joint. Stronger joints prevent separation over time. This is especially important in humid bathroom environments.
2. Moisture Sealing the Back of the Frame: The back of your frame, where it meets the mirror, is vulnerable to moisture. Even with caulk on the front, moisture can still get behind. Consider applying a bead of silicone sealant to the entire back perimeter of the frame before attaching it to the mirror. This creates a more robust moisture barrier. Ensure the sealant is non-acidic and safe for mirrors. This step prolongs the frame’s life.
3. Custom Paint Finish Techniques: Beyond a simple coat of paint, explore decorative painting techniques. You can distress the frame for a farmhouse look. Use a glaze to create an aged appearance. Apply metallic paint for a glamorous touch. Or, use stencils for unique patterns. These techniques add depth and personality to your frame. Practice on a scrap piece first.
4. Adding Decorative Elements: Consider small embellishments. You can add decorative corner blocks to your mitered frame. These provide an ornate detail and hide imperfect corner joints. Small rosettes or carved appliques can be glued onto the frame. These elements enhance the frame’s overall design. Ensure they match your chosen style.
5. Adjusting Cabinet Hinges for Perfect Alignment: A framed medicine cabinet mirror is heavier. This can sometimes cause the door to sag. Many cabinet hinges have adjustment screws. These allow you to move the door up, down, in, or out. Learn how to adjust your specific type of hinge. Proper alignment ensures the door opens and closes smoothly. It also prevents the frame from rubbing against other surfaces. This adjustment is crucial for long-term function.
6. Protecting Mirror Silvering: The back of your mirror has a silvering layer. This can be damaged by certain chemicals or moisture. When framing, ensure your adhesive and sealants are mirror-safe. Look for “non-acid cure” or “low-VOC” products. These protect the mirror’s reflective coating. This ensures your mirror stays clear and bright for years. These advanced steps require a bit more effort. They deliver superior results in both appearance and durability.
FAQ Section
Q1: Can I frame an existing medicine cabinet mirror without removing it from the wall?
Yes, you can frame a medicine cabinet mirror without removing it. If the mirror is flush with the wall, you can apply the frame pieces directly onto the mirror surface. If the mirror is recessed, you might attach the frame to the cabinet door itself, around the mirror. This avoids complex removal. Measure carefully to ensure a perfect fit.
Q2: What is the best type of adhesive to use for framing a mirror?
The best adhesive is mirror mastic or a strong construction adhesive labeled “mirror safe.” These adhesives are designed not to damage the mirror’s silvering. They also offer a strong, durable bond. Ensure the product is moisture-resistant for use in a bathroom. Apply it sparingly to prevent squeeze-out.
- medicine cabinet mirror
- mirror frame DIY
- bathroom renovation
- home improvement
- vanity mirror upgrade
- DIY projects
- trim installation

Todd Martin
Senior Writer
With over 15 years of experience in home renovation and design, I started HEG to share what I’ve learned with homeowners who want to create spaces that are both beautiful and functional. I’ve always believed in a hands-on approach, and over the years, I’ve picked up practical solutions that actually work. Through HEG, I aim to make home improvement more approachable, sharing real tips that help you create a home you truly love.