· Katria Melrose · Home Improvement · 17 min read
How To Build A Bench Seat For Kitchen Table
Build a Bench Seat for Your Kitchen Table: A Complete DIY Guide
Are you tired of cramped seating around your kitchen table? Perhaps you dream of a cozy, space-saving solution that adds charm and comfort to your dining area. I know the feeling; traditional chairs can feel bulky and limit how many people fit. Building a bench seat for your kitchen table transforms your space.
A custom bench seat creates a built-in look and maximizes seating capacity. It also offers a chance to add storage or a unique design element. This comprehensive guide walks you through every step. We will cover planning, selecting materials, construction, and finishing your new kitchen bench. Get ready to add comfort and style to your home.
Takeaway
- Plan Carefully: Measure your space and table dimensions to ensure the bench fits well.
- Choose Wisely: Select durable wood and suitable fasteners for a strong, lasting structure.
- Build Systematically: Follow step-by-step instructions for frame assembly and surface attachment.
- Finish Properly: Sand, stain, or paint your bench for durability and a polished look.
- Prioritize Safety: Use tools correctly and secure the bench to prevent accidents.
Clear, Concise Answer
To build a bench seat for your kitchen table, plan dimensions based on your table and space, gather appropriate wood and tools, construct a sturdy frame, attach a comfortable seat and optional backrest, and apply a durable finish. This process creates custom, efficient kitchen seating.
Planning Your Kitchen Bench Seat Design
Before you cut any wood, you must plan your bench seat design. This initial phase sets the stage for a successful build. Thinking through your needs prevents mistakes later on. A good plan ensures the finished bench fits perfectly and serves its purpose.
Consider how the bench will interact with your existing kitchen table. Think about who will use it and how often. Planning also includes deciding on any special features, like storage. A solid plan saves time and money in the long run.
Measuring and Sizing Your Bench
Accurate measurements are the backbone of your project. Start by measuring the length of your kitchen table. Your bench seat should ideally be slightly shorter than the table. This allows easy access to the ends. Measure the height of your table from the floor. A standard dining seat height is typically between 18 and 19 inches. This ensures comfortable legroom under the table.
Measure the depth you desire for the seat. Most comfortable bench depths range from 15 to 20 inches. A deeper bench offers more comfort but takes up more floor space. Consider the available area in your kitchen. Mark these dimensions clearly on a sketch.
Style and Functionality Choices
Think about the visual style of your kitchen. Do you want a modern, rustic, or traditional look? Your choice of wood, finish, and upholstery affects the final appearance. A simple, flat-top bench is easy to build. A bench with a backrest offers more comfort and support.
Consider the functionality. A bench can simply be a place to sit. Many homeowners choose to build a bench with hidden storage. This can be a lift-top lid or pull-out drawers. Storage adds immense value, especially in smaller kitchens. Decide on these features early in the planning stage.
Choosing the Right Bench Location
Your bench seat can stand freely or sit against a wall. A freestanding bench offers flexibility. You can move it around if needed. A bench built against a wall maximizes space. It also provides built-in stability.
If building against a wall, ensure the wall is sturdy enough. You might need to secure the bench to wall studs. This adds extra safety and prevents tipping. Think about traffic flow in your kitchen. The bench should not block pathways or access to cabinets. Building a bench seat against a wall can create a cozy, defined dining nook. For more ideas on wall-mounted benches, consider exploring resources on how to build a bench seat against a wall.
Essential Tools and Materials for Bench Building
Building a sturdy and attractive bench seat requires the right tools and materials. Choosing quality items makes the construction process smoother. It also ensures your finished bench lasts for years. Do not rush this step. Gather everything before you start cutting.
Having all your supplies ready prevents interruptions. It also reduces trips to the hardware store. Investing in proper tools is wise for any DIY project.
Wood Choices for Durability and Aesthetics
The type of wood you choose greatly impacts your bench’s durability and appearance. Plywood is an excellent choice for the main structure. It is strong, stable, and relatively inexpensive. For visible surfaces, consider higher-grade plywood or solid lumber. Common lumber options include pine, oak, maple, or poplar. Pine is affordable and easy to work with. Oak and maple are harder woods, more durable, and have beautiful grain patterns.
Select kiln-dried lumber to prevent warping or cracking later on. Check boards for straightness and absence of large knots. The thickness of your wood matters for stability. For the frame, 2x4s or 2x6s are common. For the seat top, 3/4-inch plywood or solid planks work well.
Fasteners, Adhesives, and Hardware
Strong connections are crucial for a bench seat that withstands daily use. Wood screws are essential for assembling the frame. Choose screws long enough to penetrate both pieces of wood. Ensure they are suitable for structural use. Use wood glue in addition to screws for maximum strength. Glue creates a bond stronger than the wood itself.
Consider pocket hole screws for cleaner, concealed joints. This method uses a special jig to drill angled holes. You screw through these holes into the adjoining piece. For storage benches, you will need hinges for lift-tops or drawer slides for drawers. Select heavy-duty hardware that can handle the weight.
Power and Hand Tools for Construction
You will need a mix of power tools and hand tools. A miter saw or circular saw makes accurate cuts for your lumber. A drill is essential for pre-drilling holes and driving screws. A tape measure, pencil, and speed square ensure precise markings. Safety glasses and hearing protection are a must.
Other useful tools include a level to ensure everything is straight. Clamps hold pieces together while glue dries or you drive screws. A sander prepares surfaces for finishing. If you plan to use pocket holes, a pocket hole jig is necessary. Having a good set of hand tools, like a hammer and chisel, can also be helpful for minor adjustments.
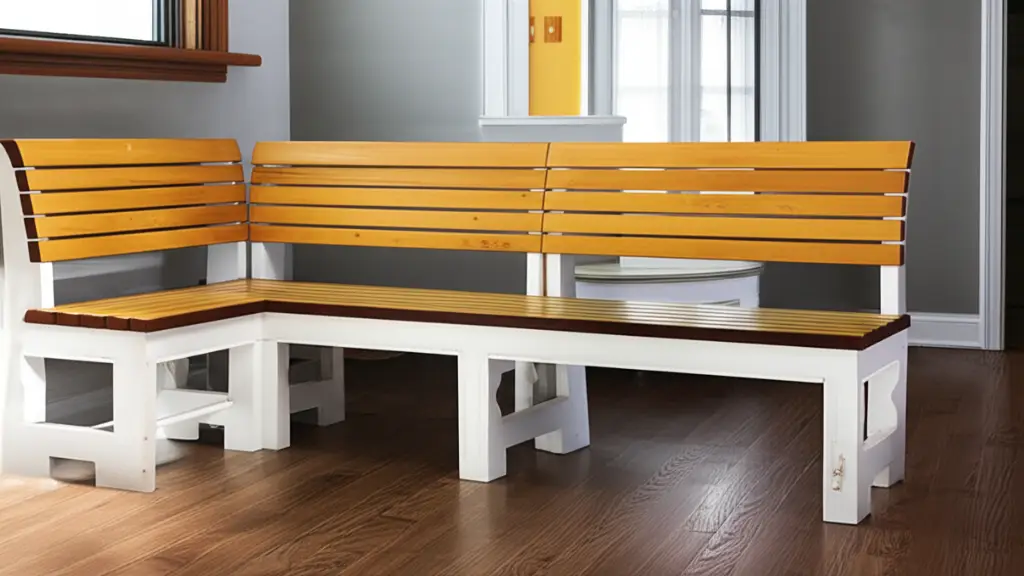
Constructing the Bench Frame: Step-by-Step
Building the frame is the most critical part of your bench project. The frame provides the core structure and supports the weight. A strong frame ensures your bench is safe and durable. Take your time with each step to ensure accuracy.
This section breaks down the process into clear, manageable steps. Following these instructions carefully will lead to a sturdy foundation for your bench seat. Precision here will make all subsequent steps easier.
Cutting Lumber Accurately
Start by cutting all your lumber pieces to the exact dimensions determined in your planning stage. Use a miter saw or circular saw for straight and accurate cuts. Double-check each measurement before you cut. Mark your cuts clearly with a pencil.
Make sure your saw blade is sharp. A dull blade can cause splintering or inaccurate cuts. When cutting, support the lumber properly. This prevents dangerous kickback. Label each cut piece as you go. This helps with assembly later.
Assembling the Bench Base
The bench base forms the perimeter and support of your seat. Begin by assembling the long front and back rails. Connect them to the shorter side rails. Use wood glue on all mating surfaces. Then, secure them with wood screws or pocket hole screws. Ensure all corners are square using a speed square.
Add internal support bracing. These pieces run across the width of the bench frame. They provide extra strength for the seat top. Space these supports evenly. For a long bench, you may need a center support leg. This prevents sagging over time.
Adding Support Structures and Legs
Once the main base is assembled, attach the legs. You can create legs from the same lumber as your frame. Alternatively, you can purchase pre-made legs. Securely attach the legs to the corners of your base frame. Use robust screws and wood glue for strong joints.
For a bench against a wall, you may only need legs on the front. The back of the bench can be supported by cleats attached to the wall. Ensure the legs are plumb and level. This creates a stable and wobble-free structure.
Crafting the Bench Top and Backrest
With the frame complete, the next phase focuses on the visible surfaces: the seat and the optional backrest. These elements determine the comfort and final aesthetic of your bench. Pay attention to smooth finishes and secure attachments.
Choosing the right materials and methods for the top and backrest ensures a functional and attractive bench. This is where your bench truly begins to take shape.
Attaching the Seat Surface
The seat surface is typically a single piece of plywood or several solid wood planks. If using plywood, cut it to the exact dimensions of your bench frame. For solid wood planks, arrange them evenly across the frame. Secure them with wood glue and screws from underneath. This hides the fasteners for a cleaner look.
If your bench includes storage, the seat will act as a lid. In this case, you will attach hinges to the back of the seat. The hinges connect the seat to the top of the bench frame. Ensure the hinges are strong enough to support the lid’s weight. Test the lid’s movement to confirm it opens smoothly. For various methods of attaching wooden elements, exploring options like how to attach wood table top to metal frame might provide alternative insights, although your bench is primarily wood-on-wood.
Building a Comfortable Backrest (Optional)
Adding a backrest enhances comfort significantly. A backrest can be a simple panel attached to vertical supports. Alternatively, you can build a more elaborate slatted design. If your bench is against a wall, the backrest can attach directly to the wall studs. This provides excellent stability.
For a freestanding bench, the backrest needs its own frame. Attach vertical supports to the rear of your bench frame. Then, secure the backrest panel or slats to these supports. Ensure the backrest height is comfortable. A common height is 12-18 inches above the seat. For a padded backrest, you will need to add foam and fabric.
Finishing Your DIY Kitchen Table Bench
The finishing touches transform your functional bench into a beautiful piece of furniture. This stage involves preparing the surfaces and applying a protective coating. A good finish enhances the wood’s natural beauty and protects it from spills and wear.
Do not skip steps in this phase. Proper finishing ensures your bench seat lasts longer and looks its best. It also makes cleaning and maintenance easier.
Sanding and Preparing Surfaces
Sanding is crucial for a smooth, professional finish. Start with a coarser grit sandpaper (e.g., 80 or 100-grit) to remove any imperfections or rough spots. Gradually move to finer grits (e.g., 150, 180, 220-grit). This process removes sanding marks and creates a silky-smooth surface. Sand with the grain of the wood.
After sanding, wipe down all surfaces thoroughly. Use a tack cloth or a damp cloth to remove all dust. Any remaining dust will get trapped under your finish. This creates a bumpy texture. For larger surfaces like the seat top, you might find power tools helpful. Learning how to sand a table with an electric sander or how to use a belt sander on a table top can speed up this process significantly.
Staining, Painting, or Sealing
Now, apply your chosen finish. If you want to highlight the wood grain, use a wood stain. Apply stain evenly with a brush or rag. Wipe off excess according to product instructions. If you prefer a solid color, prime the wood first, then apply several coats of paint. Lightly sand between paint coats for a smoother result.
For durability, especially in a kitchen environment, apply a protective topcoat. Polyurethane, lacquer, or varnish work well. These clear coats protect against moisture, scratches, and wear. Apply multiple thin coats, allowing adequate drying time between each.
Upholstery and Cushioning (Optional)
For added comfort and style, consider adding upholstery or cushions. You can create a removable cushion or permanently upholster the seat. For a simple removable cushion, cut foam to the seat size. Wrap it with batting and then your chosen fabric. Create a fabric cover with a zipper for easy cleaning.
To permanently upholster the seat, staple foam and batting directly to the seat surface. Then, pull fabric tightly over it and staple it underneath. This creates a padded seat. Learning how to add a padded seat to a wooden chair provides excellent guidance for this step. Regular cleaning is important for upholstered surfaces; for general wood table care, you might find tips on how to clean a wood table useful in maintaining the surrounding area.
Integrating Storage and Special Features
A kitchen bench seat offers a fantastic opportunity for integrated storage. This feature makes your bench highly functional. It helps keep your kitchen tidy and organized. Thinking about storage early in the design phase is key.
Storage can take many forms, from simple lift-tops to more complex drawer systems. Adding these features elevates your bench from just a seat to a valuable piece of multi-purpose furniture.
Lift-Top Storage Solutions
The most common and easiest storage solution is a lift-top bench. The entire seat surface acts as a lid. This lid lifts to reveal a spacious storage compartment underneath. You simply build a box frame for the bench base. Then, attach the seat top using piano hinges or heavy-duty butt hinges.
Ensure the hinges are strong enough to support the lid. Add safety features like soft-close lid supports. These prevent the lid from slamming shut on fingers. Lift-top storage is perfect for blankets, seasonal items, or less frequently used kitchen gadgets.
Drawer Systems for Easy Access
For more accessible storage, consider integrating drawers into your bench. This requires more complex construction. You will need to build drawer boxes and install drawer slides. The slides allow the drawers to glide smoothly in and out. Drawers can be full-width or smaller individual units.
Measure and build the drawer openings precisely within your bench frame. Use high-quality drawer slides for durability. Drawer storage is ideal for items you need to access often. Think placemats, napkins, or kids’ art supplies. Building a kitchen island often involves similar joinery for cabinets; insights from how to build a kitchen island with stock cabinets or how to make a kitchen island out of base cabinets could inspire your drawer construction.
Built-in Shelving or Cubbies
If you prefer open storage, you can design your bench with built-in shelving or cubbies. This works well for displaying decorative items. It also suits storing books or board games. You create individual compartments within the bench frame.
This type of storage is easy to access. It also adds visual interest to the bench design. Ensure the shelves are strong enough to hold the items you plan to store. Built-in shelving makes the bench feel lighter. It integrates well into an open-concept kitchen.
Safety First: Important Considerations
Building a bench seat involves woodworking tools and materials. Safety should always be your top priority. Accidents can happen if you are not careful. Taking proper precautions protects you and your home.
Review all safety guidelines before you start. Use appropriate protective gear. Understand how your tools work before operating them.
Using Power Tools Safely
Power tools make building easier, but they require respect. Always wear safety glasses to protect your eyes from flying debris. Hearing protection is also important, especially when using saws. Wear gloves to protect your hands, but remove them when operating tools with rotating parts. Loose gloves can get caught.
Ensure your work area is clean and free of clutter. This prevents tripping hazards. Keep children and pets away from your workspace. Always unplug power tools when changing blades or making adjustments. Never force a tool; let the tool do the work. Read the instruction manual for each tool you use.
Securing the Bench Properly
A bench seat must be stable and secure. This prevents tipping or wobbling. If your bench is against a wall, secure it directly to wall studs. Use long screws that penetrate deep into the studs. Locate studs using a stud finder. This provides maximum stability.
For freestanding benches, ensure all joints are tightly screwed and glued. Test the bench for stability before use. Apply weight to different parts of the bench to check for any give. If it wobbles, identify the source. Add more bracing or adjust leg lengths as needed. A stable bench is a safe bench.
Ventilation for Finishes
When applying stains, paints, or sealers, ensure good ventilation. Many of these products emit fumes. These fumes can be harmful if inhaled in a confined space. Work in a well-ventilated area. Open windows and doors. Use fans to circulate air.
Consider wearing a respirator mask specifically designed for paint fumes. Read the product labels for specific safety warnings. Allow finishes to dry completely in a well-ventilated space. This ensures the fumes dissipate. Proper ventilation protects your health during the finishing process.
FAQ Section
How long does it take to build a bench seat for a kitchen table?
Building a basic bench seat usually takes 1-3 full days of work. This includes planning, cutting, assembling, and applying finishes. More complex designs, like those with extensive storage or intricate details, can take longer. Drying times for glues and finishes also add to the overall project duration.
What wood is best for a kitchen bench seat?
For durability and appearance, common choices include pine for affordability and ease of work, or oak and maple for harder, more resilient surfaces. Plywood (especially hardwood plywood) is excellent for structural components and seat tops. Ensure the wood is kiln-dried to prevent warping.
Can I build a bench seat without a backrest?
Yes, you can absolutely build a bench seat without a backrest. This design creates a simpler, more minimalist look. It can also be beneficial in smaller spaces where a backrest might feel too bulky. Many modern bench designs intentionally omit the backrest for a streamlined aesthetic.
How do I make a bench seat comfortable?
To make a bench seat comfortable, add cushions or upholstery. You can create removable seat cushions filled with high-density foam and covered in durable fabric. For a built-in padded feel, permanently upholster the seat surface. Consider the depth and height of the bench for ergonomic comfort.
What is the standard height for a kitchen bench seat?
The standard height for a kitchen bench seat is typically between 18 and 19 inches from the floor to the top of the seat. This height ensures comfortable seating and allows sufficient legroom under a standard kitchen table, which is usually around 29-30 inches high.
How much does it cost to build a bench seat?
The cost to build a bench seat varies greatly depending on materials and complexity. A simple pine bench might cost $100-$300 for materials. A bench made from hardwood, with storage and upholstery, could cost $400-$800 or more. Labor costs are zero for a DIY project.
Conclusion
Building a bench seat for your kitchen table is a rewarding home improvement project. You gain a customized, space-saving seating solution. You also enhance your kitchen’s style. This guide walked you through every critical step. We covered meticulous planning and material selection. We also detailed the construction process. Finally, we looked at the all-important finishing touches.
Remember to prioritize safety at every stage. A well-built bench adds comfort and functionality to your kitchen for years. I encourage you to embark on this DIY journey. Imagine your family gathering around your kitchen table, enjoying the new, cozy bench seat. Start your planning today and transform your kitchen.
- DIY Furniture
- Kitchen Seating
- Woodworking Projects

Katria Melrose
Cleaning Specialist
With over 12 years of experience in commercial cleaning and a certification in workplace ergonomics, I’ve developed a deep understanding of what makes a workspace truly productive. At HEG, I specialize in helping people transform their home offices into clean, efficient, and comfortable environments. Through smart cleaning routines and strategic organization solutions, I empower readers to create spaces that support focus, comfort, and success—one well-organized desk at a time.