· Todd Martin · Home Improvement · 16 min read
How To Replace Webbing On Lawn Chairs

How To Replace Webbing On Lawn Chairs
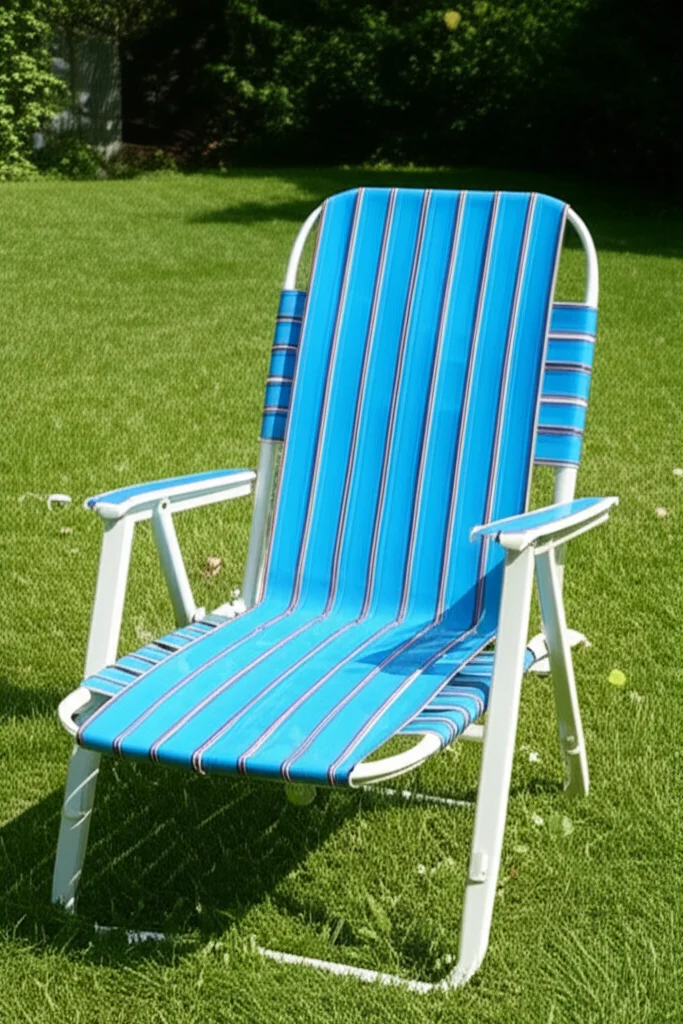
Our outdoor spaces are special. They offer a place to relax and enjoy nature. Lawn chairs often become worn out over time. Their webbing can fray, tear, or lose its strength. Replacing the webbing on your lawn chairs is a smart choice. It saves money and brings new life to old furniture. This guide helps you restore your chairs. We will cover everything from choosing materials to the final steps. Get ready to give your favorite lawn chairs a fresh start.
Takeaway
- Gather essential tools and materials before starting.
- Remove old webbing carefully to prepare the chair frame.
- Measure and cut new webbing precisely for a neat fit.
- Attach webbing securely using fasteners or weaving techniques.
- Maintain your rewebbed chairs for lasting durability.
Replacing webbing on lawn chairs involves removing old straps, cleaning the frame, measuring and cutting new UV-resistant webbing, then attaching it securely to the chair frame using rivets, screws, or clips in a woven pattern for renewed strength and comfort.
Why Webbing Fails and Why Replace It?
Lawn chairs sit outside for many months. Sun, rain, and humidity all affect them. Over time, the webbing on these chairs starts to break down. UV rays from the sun cause the material to become brittle. Rain and moisture lead to mildew and weakening. Heavy use also stretches and frays the straps.
Ignoring damaged webbing makes chairs uncomfortable. It also makes them unsafe to sit on. A broken strap can cause someone to fall. Replacing the webbing fixes these problems. It makes your chairs safe and comfortable again. This process also saves you money. Buying new chairs costs more than repairing old ones.
Repairing old items promotes sustainability. It reduces waste in landfills. You get to keep a favorite chair and feel proud of your work. The process is simpler than you might think. Many people enjoy the challenge of a DIY project. It is a rewarding way to improve your outdoor living area.
Essential Tools and Materials for Webbing Replacement
Before you begin, gather all your supplies. Having everything ready makes the job easier. You will need a few basic tools and the right materials. This preparation step is very important for a smooth process. Do not skip it, or you may face delays. I always make a checklist before starting any home project.
First, you need the new webbing. Outdoor chair webbing usually comes in rolls. Look for UV-resistant material like vinyl or polypropylene. These materials handle outdoor conditions well. They come in various colors and widths. Choose a width that matches your old webbing.
Next, consider the fasteners. Common options include rivets, screws, or special clips. Rivets provide a strong, permanent hold. Screws allow for easier removal later if needed. Clips are often used on specific chair designs. Make sure your chosen fasteners work with your chair’s frame material.
Here is a list of what you will likely need:
- New Webbing Roll: UV-resistant vinyl, polypropylene, or polyester.
- Measuring Tape: For accurate length cuts.
- Utility Knife or Strong Scissors: To cut the old and new webbing.
- Drill with Rivet Gun (if using rivets): For securing straps firmly.
- Screwdriver (if using screws): To attach webbing with screws.
- Pliers: Helpful for removing old fasteners or tightening.
- Marker: To mark cut lines on the webbing.
- Work Gloves: To protect your hands.
- Safety Glasses: To shield your eyes, especially when drilling or using a rivet gun.
- Cleaning Supplies: For preparing the chair frame (e.g., dish soap, water, scrub brush).
- Rust Remover or Primer (if needed): For metal frames. You might find my guide on how to remove rust from metal chairs useful here.
Having these items ready prevents interruptions. It makes the replacement process efficient. I always find a dedicated workspace also helps keep things organized.
Preparing Your Lawn Chair Frame for New Webbing
Proper preparation ensures your new webbing lasts a long time. It also makes the installation process much smoother. Start by carefully removing all the old webbing. Use a utility knife or strong scissors to cut through the old straps. Be careful not to scratch the chair frame. If the webbing is held by rivets, you may need to drill them out. For screws, simply unscrew them.
Once all the old webbing is off, inspect the chair frame. Look for any damage or rust. Metal frames might show signs of corrosion. If you find rust, clean it thoroughly. A wire brush can help remove loose rust. Then, apply a rust-inhibiting primer or paint. This step protects the frame and extends its life. Cleaning the frame also improves the appearance of your refurbished chair.
Clean the entire frame with soap and water. Remove dirt, grime, and mildew. A scrub brush can help with stubborn spots. Rinse the frame well and let it dry completely. A clean, dry frame provides a better surface for attaching new webbing. This part of the process is important for the chair’s overall durability. Thinking about other chair types, preparing a frame is similar to how you might prepare a cane back chair with fabric for a new material.
After cleaning, check all frame connections. Tighten any loose bolts or screws. Ensure the chair frame is stable and sturdy. A strong frame is essential for supporting the new webbing. This preparation lays the groundwork for a successful repair. You want your chair to be as good as new.
Measuring and Cutting New Webbing Accurately
Accurate measurements are key to a professional-looking rewebbing job. Too short, and the webbing will be too tight or not reach. Too long, and it will sag and look messy. Take your time with this step. It affects the comfort and appearance of the finished chair. I always double-check my measurements to avoid mistakes.
Start by determining the pattern of the old webbing. Most lawn chairs use a simple woven pattern. This involves straps running vertically and horizontally. Some chairs may have diagonal straps too. Note how the old straps crossed over and under each other. If the old webbing is completely gone, look for holes or attachment points on the frame.
For horizontal straps, measure the distance from one attachment point to the other across the chair. Add 4 to 6 inches to this measurement. This extra length allows for wrapping around the frame and securing the ends. For vertical straps, measure the distance from top to bottom, also adding 4 to 6 inches. Always measure each strap individually, especially if the chair frame is not perfectly symmetrical.
Cut the webbing cleanly using a sharp utility knife or strong scissors. A clean cut prevents fraying. If you are using vinyl webbing, you can often heat-seal the ends slightly. This melts the fibers together, preventing future fraying. This is similar to techniques used when you install cane webbing on cabinet doors, where neat edges are important.
Pro Tip for Measuring:
- Measure twice, cut once: This old saying holds true for a reason.
- Create a template: For multiple straps of the same length, cut one first. Test its fit, then use it as a template for the others.
- Consider tension: You want the webbing to be taut but not stretched to its breaking point. The extra length allows for pulling it tight before securing.
Once all your straps are measured and cut, organize them. Separate horizontal from vertical straps. This makes the weaving process faster and less confusing. This careful preparation saves time during the actual installation.
Attaching the Webbing: Step-by-Step Guide
Attaching the new webbing is the most satisfying part. This is where your chair starts to come back to life. The method of attachment depends on your chair’s design and chosen fasteners. I find working on one strap at a time helps keep things organized. This also ensures proper tension.
Method 1: Using Rivets Many aluminum-frame lawn chairs use rivets. This creates a very strong bond.
- Attach First End: Take one strap. Wrap one end around the chair frame. Overlap the strap onto itself by about 2-3 inches. Line it up with the existing rivet holes, or mark new ones if needed.
- Drill Holes: Use a drill bit slightly larger than your rivets to drill through both layers of webbing and the chair frame.
- Insert Rivet: Place a rivet through the holes. Use a rivet gun to secure it. Squeeze the rivet gun handles until the rivet “pops.” This indicates it is fully secured.
- Tension the Strap: Pull the strap across the chair frame to the opposite side. Pull it very tight. You want minimal sag.
- Secure Second End: Wrap the strap around the frame. Overlap it and mark the rivet holes. Drill and secure with rivets.
- Repeat: Follow these steps for all horizontal straps first. Then, do the same for the vertical straps.
Method 2: Using Screws Screws are often used with plastic or wood frames, or if you prefer a removable attachment.
- Attach First End: Wrap one end of the webbing around the chair frame. Overlap it by about 2-3 inches. Line it up with existing screw holes, or mark new ones.
- Pilot Holes (Optional): For wood or hard plastic, drill small pilot holes. This prevents the material from splitting.
- Secure with Screws: Drive screws through the webbing and into the frame. Use screws appropriate for outdoor use, such as stainless steel.
- Tension and Secure Second End: Pull the strap tight across the chair. Wrap it around the opposite frame side. Secure it with screws.
- Repeat: Continue this process for all straps.
Method 3: Using Webbing Clips Some chairs are designed for specific webbing clips or pins.
- Slide and Secure: Often, you slide one end of the webbing into a slot or around a pin on the frame.
- Tension and Clip: Pull the webbing tightly across. Attach the other end to a corresponding clip or slot. These clips are usually made to hold the webbing firmly without additional fasteners.
- Repeat: Follow the chair’s specific design for securing each strap.
Weaving the Webbing for Optimal Support
The weaving pattern is crucial for comfort and support. Most lawn chairs use a simple over-under pattern. This creates a strong, interlocking surface. It distributes weight evenly. If you have removed all old webbing, you will start with an empty frame. I always find it helpful to visualize the pattern before I begin.
Start by attaching all your horizontal straps first. Make sure they are evenly spaced. This creates the base of your seat and back. Then, begin with your vertical straps. You will weave these through the horizontal ones.
Basic Over-Under Weaving:
- First Vertical Strap: Take your first vertical strap. Go over the first horizontal strap, under the second, over the third, and so on. Continue this pattern across the entire chair.
- Second Vertical Strap: For the next vertical strap, reverse the pattern. If the first strap went over the first horizontal, the second strap goes under it. Then over the second, under the third, and so forth. This creates the checkerboard effect.
- Continue Alternating: Keep alternating the over-under pattern with each subsequent vertical strap. This ensures a tight, supportive weave.
- Adjust and Tighten: As you weave, push the straps together. Make sure there are no large gaps. You want a firm surface. Pull the vertical straps taut before securing their ends.
Tips for Weaving:
- Work Methodically: Do not rush. One row at a time.
- Maintain Tension: Keep the straps tight as you weave. A loose weave will result in a saggy chair.
- Even Spacing: Use a measuring tape or even your fingers to ensure consistent spacing between straps. This makes the chair look neat and provides uniform support.
- Secure Ends Properly: Once a vertical strap is woven, secure both its ends to the frame using your chosen fasteners (rivets, screws, or clips).
Proper weaving ensures your chair is comfortable. It also adds to the chair’s durability. A well-woven seat will support weight correctly. It extends the life of your rewebbed lawn chair. This step truly brings the chair back to its original function.
Finishing Touches and Maintenance for Longevity
After attaching and weaving all the webbing, you are almost done. Now comes the time for finishing touches. These steps ensure your chair looks great and lasts for many years. A little extra effort at this stage makes a big difference. I always clean up my workspace after a project.
First, trim any excess webbing. Cut any frayed edges neatly. You want a clean, finished look. If you used screws, make sure they are tightened securely. If you used rivets, check that they are all fully popped. All fasteners should be flush and not snag on clothing.
Next, give the entire chair a final wipe down. Remove any dust, debris, or fingerprints from the process. This reveals your newly refurbished chair. You can also apply a protective spray to the frame if it is metal. This helps prevent future rust. For frames made of resin, a simple cleaning with soap and water is usually enough, similar to how you would clean resin chairs.
Maintenance Tips for Your Rewebbed Lawn Chair:
- Clean Regularly: Wipe down the webbing and frame with mild soap and water. This removes dirt and prevents mildew buildup. Regular cleaning keeps the webbing looking fresh.
- Store Properly: During off-seasons or bad weather, store your lawn chairs indoors. A garage or shed protects them from extreme elements. This prevents premature wear from sun and rain.
- Avoid Harsh Chemicals: Do not use strong cleaners on the webbing. They can degrade the material. Stick to gentle soap and water.
- Check for Wear: Periodically inspect the webbing and fasteners. Look for any signs of fraying or loosening. Address small issues before they become big problems.
- Distribute Weight: Encourage users to sit evenly on the chair. Concentrated weight on one spot can stretch the webbing faster.
Following these maintenance tips helps your rewebbed lawn chairs last. They will provide comfort and style for many more seasons. This DIY repair is an investment in your outdoor enjoyment.
Troubleshooting Common Webbing Replacement Issues
Sometimes, things do not go exactly as planned. Even with careful preparation, you might encounter small issues. Do not get discouraged. Most problems are easy to fix. I have faced many minor setbacks in my DIY projects. Learning to troubleshoot makes you a better DIYer.
Issue 1: Webbing is Too Loose or Saggy
- Problem: You did not pull the webbing tight enough before securing it.
- Solution: If possible, unfasten one end of the strap. Pull it tighter, then re-secure. If using rivets, you might need to drill them out and use new ones. For screws, simply unscrew and reposition. Remember, you want it taut but not overstretched.
Issue 2: Webbing Ends are Fraying
- Problem: The cut ends were not sealed or cut cleanly.
- Solution: For vinyl or polypropylene webbing, carefully use a lighter or a heat gun to slightly melt the edges. Do this quickly to avoid burning the material. For polyester webbing, use fabric glue or a fray-check product.
Issue 3: Rivets or Screws Are Not Holding
- Problem: The fasteners are too small, or the holes are too large. The chair material might be too soft or damaged.
- Solution: Use larger fasteners. If the hole in the frame is stripped, you might need to use a slightly larger screw or a bolt with a nut for a stronger hold. For rivets, ensure your rivet gun is working correctly and you are using the right size rivet for the hole.
Issue 4: Uneven Weaving Pattern
- Problem: Straps were not spaced consistently or the over-under pattern was inconsistent.
- Solution: Unweave the problematic section. Re-weave it, paying close attention to the pattern and spacing. Use a ruler or guide marks if needed. Adjust the position of straps before securing them. This attention to detail improves the look.
Issue 5: Chair Frame is Wobbly After Rewebbing
- Problem: Loose frame joints were not tightened during preparation.
- Solution: Flip the chair over. Check all bolts and screws on the frame joints. Tighten any that are loose. If a joint is bent or broken, it might require a more significant repair. This ensures the entire chair is stable.
By addressing these common issues, you can ensure your rewebbed lawn chair is safe and looks fantastic. Each repair teaches you something new.
FAQ Section
Q1: What type of webbing is best for outdoor lawn chairs? A1: The best webbing for outdoor lawn chairs is typically made from UV-resistant materials. Vinyl, polypropylene, and polyester are good choices. These materials withstand sun exposure and moisture well. They also offer good durability and comfort. Choose a material that matches your chair’s original style and your personal preference.
Q2: How much webbing do I need to replace one lawn chair? A2: The amount of webbing needed varies by chair size and design. A general rule is to measure each strap’s length, adding 4-6 inches for wrapping and securing. Sum up all these lengths. Most standard lawn chairs may require 50-100 feet of webbing. Buying a bit extra is always a good idea.
Q3: Can I use fabric instead of traditional webbing? A3: Using fabric is generally not recommended for webbing replacement. Traditional outdoor webbing is designed to withstand harsh weather. Fabric, especially upholstery fabric, may not be UV-resistant or water-resistant. It can rot, fade, or tear quickly outdoors. For best results, stick with materials specifically made for outdoor chair webbing.
Q4: How long does it take to replace webbing on a lawn chair? A4: The time required depends on your skill level and the chair’s complexity. For a first-timer, it might take 2-4 hours per chair. Experienced DIYers can complete it faster. Preparation, measuring, and careful weaving all contribute to the time. It is a rewarding project, so take your time.
Q5: Is rewebbing a lawn chair cost-effective? A5: Yes, rewebbing a lawn chair is highly cost-effective. A roll of webbing and fasteners costs much less than buying a brand-new lawn chair. It extends the life of your existing furniture. This saves money and reduces waste. It is a smart way to refresh your outdoor space on a budget.
Q6: What is the ideal tension for new webbing? A6: The ideal tension for new webbing is taut but not overly stretched. You should be able to press down on the webbing slightly without it feeling loose. Over-stretching can cause the material to wear out faster. Under-stretching leads to sagging. Aim for a firm, supportive surface that holds its shape.
Conclusion
Replacing the webbing on your lawn chairs is a project anyone can do. It brings new life to old furniture. This guide provided all the steps needed. From gathering tools to the final weave, you now have the knowledge. You learned how to prepare the frame and choose the right materials. Measuring and cutting accurately are key for a good finish. The various attachment methods give you options.
Weaving the webbing correctly ensures comfort and durability. Do not forget those important finishing touches and regular maintenance. Your rewebbed lawn chairs will provide many more seasons of enjoyment. This project saves money and helps the environment. Get started on your lawn chair repair today. Enjoy your refreshed outdoor seating!
- lawn chair repair
- outdoor furniture DIY
- chair webbing replacement


