· Todd Martin · Home & Garden · 13 min read
How To Keep Chicken Coop Clean
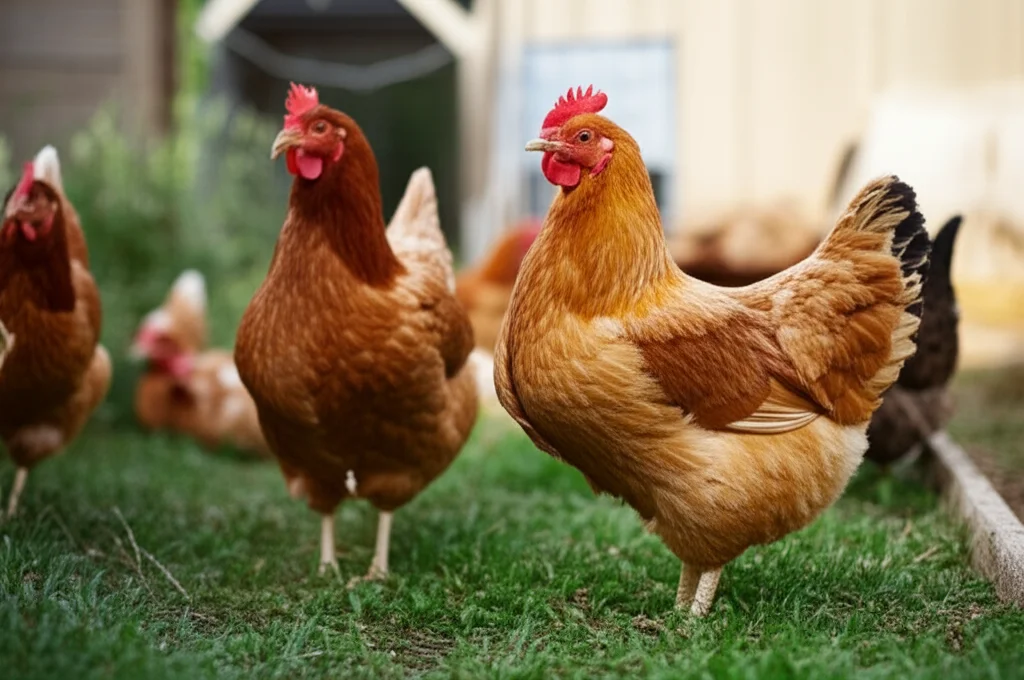
How To Keep Chicken Coop Clean: Essential Tips for a Healthy Flock
Keeping a chicken coop clean feels like a constant battle, doesn’t it? Chicken coops, by their very nature, can become messy quickly. However, maintaining a clean chicken coop is not just about aesthetics; it is vital for the health and happiness of your flock. A dirty coop leads to bad odors, attracts pests, and creates a breeding ground for diseases.
I know the struggle. I have learned over time that a consistent cleaning routine saves a lot of trouble later. This guide will walk you through everything you need to know about how to keep chicken coop clean. We will cover daily chores, weekly maintenance, and annual deep cleaning strategies. By following these steps, you will create a safe and hygienic environment for your feathered friends. A clean coop means healthy chickens.
Takeaway:
- Regular, consistent cleaning prevents health issues and pests.
- Establish daily spot cleaning and weekly full bedding changes.
- Perform deep cleaning at least once or twice a year.
- Proper ventilation and bedding choice are key to moisture and odor control.
- Always remove chickens during major cleaning tasks for their safety.
To keep a chicken coop clean, implement a consistent schedule involving daily waste removal, weekly bedding changes, and annual deep cleaning. Ensure proper ventilation and use absorbent bedding to manage moisture and odor. This routine promotes a healthy environment, preventing disease and pest issues for your flock.
Establishing a Regular Cleaning Schedule
A consistent cleaning schedule is the cornerstone of keeping a chicken coop clean. You cannot just clean when it looks dirty. Regular cleaning prevents problems from becoming overwhelming. It helps you stay on top of manure buildup, potential pests, and odors. A schedule also ensures your chickens live in a hygienic space.
We need to break down cleaning tasks into different frequencies. Some tasks require daily attention, others weekly, and some only once or twice a year. This systematic approach makes the process manageable. It also helps in identifying potential issues early on. I find that a well-planned schedule reduces the overall effort needed. It stops small messes from turning into big, unhealthy problems. This organized method makes coop maintenance simple and effective.
Think of it like cleaning your own home. You do not wait for mold to grow before you wipe down surfaces. The same applies to your chicken coop. Prevention through regular cleaning is always better than trying to fix a major mess. Start your routine today for a healthier flock tomorrow.
Daily Chicken Coop Chores
Daily chores are essential for maintaining immediate cleanliness in your chicken coop. These small tasks make a big difference in preventing odor buildup and keeping your chickens comfortable. They only take a few minutes each day. Neglecting them causes larger problems to develop quickly. I always begin my day with these quick checks.
First, check and refresh waterers. Chickens need access to clean, fresh water at all times. Dirty water can spread diseases rapidly. Rinse out waterers daily and refill them with clean water. You can learn more about this by reading our guide on how to keep chicken water clean. Second, check feeders and remove any spoiled feed. Old feed can attract pests and grow mold, which is harmful to chickens. Make sure feed is dry and easily accessible.
Next, conduct a quick “poop patrol” in the coop. Use a small scoop or trowel to remove visible droppings from roosting bars and nesting boxes. This prevents manure from building up and reduces ammonia fumes. Ammonia fumes irritate chickens’ respiratory systems. Fluff up the bedding material to help it dry out and distribute the remaining waste. This daily attention keeps the coop fresher and minimizes the need for drastic cleaning later. It is a simple habit, but it provides huge benefits for your flock’s health.
Weekly Coop Maintenance
Weekly coop maintenance builds upon daily chores, providing a more thorough clean. This routine helps to manage bedding, control odors, and keep the coop environment healthy. Dedicate a specific day each week for these tasks. I usually do mine on a Saturday morning. It makes it easier to remember and stick to.
Start by removing all soiled bedding from the coop floor and nesting boxes. Depending on your bedding type and chicken numbers, you might remove all of it or just the top, dirtier layers. Fresh bedding significantly reduces ammonia levels and moisture. Spread a new, thick layer of clean, absorbent bedding material. Good bedding choices include pine shavings, straw, or hemp. These materials absorb moisture effectively and provide insulation.
Next, sweep or scrape any built-up droppings from roosting bars, walls, and ledges. You can use a stiff brush or a putty knife for this. Ensure all surfaces chickens contact are clear of debris. Inspect the coop for any damp spots or signs of mold growth. If you find mold, address it immediately. You can often clean minor mold spots with a solution like white vinegar. For more detailed instructions on dealing with mold, you might find our guide on how to clean mold with vinegar helpful. This weekly effort prevents serious issues from developing. It also keeps the coop smelling much better.
Clean out feeders and waterers more thoroughly than your daily rinse. Scrub them with soap and water, then rinse them completely. Let them dry in the sun if possible. Sunlight helps to naturally sanitize. Inspect the coop for any damage or needed repairs. This might include checking for loose boards or holes. Addressing these issues now prevents bigger problems later. Weekly maintenance is crucial for a continuously clean and safe chicken habitat.
Deep Cleaning Your Chicken Coop
Deep cleaning your chicken coop is a comprehensive task you should perform at least once or twice a year. This process involves thoroughly cleaning and sanitizing the entire structure. It removes accumulated grime, kills pathogens, and addresses hidden issues. A deep clean provides a fresh start for your flock’s home. I usually schedule mine in the spring and fall.
First, remove all chickens from the coop. This is crucial for their safety during the cleaning process. Move them to a temporary pen or run. Next, remove all bedding, feeders, waterers, roosting bars, and nesting boxes. Take out anything that is not permanently fixed. Scrape out all remaining dried manure and debris from the floor, walls, and ceiling. Use a shovel, scraper, and stiff brush. Pay close attention to corners and crevices where dirt can accumulate.
Once all solid waste is gone, you can start washing. Use a pressure washer or a hose with a spray nozzle to thoroughly rinse down the interior surfaces. A mild, pet-safe disinfectant solution can be used after rinsing. Choose a disinfectant specifically designed for poultry environments. Read product labels carefully for proper dilution and application. Apply the solution to all surfaces, scrub as needed, and then rinse again completely. Allow everything to air dry fully. Proper drying prevents mold and mildew. You can even find tips on general home clean-up principles that apply to larger projects like this, as seen in our article on how to do clean up at home.
While the coop dries, clean and sanitize all removable equipment. Scrub roosting bars, nesting boxes, feeders, and waterers with disinfectant and rinse them well. Repair any damage you find, such as loose boards or rusty hardware. If your coop has a wooden floor, inspect it for rot or wear. Our guide on how to clean wood floors can offer general insights into wood care, though a coop floor might need a more rugged approach. Once everything is dry, return the clean equipment to the coop. Then, add fresh, clean bedding. This thorough cleaning ensures a truly hygienic environment for your chickens.
Choosing the Right Bedding Material
Choosing the right bedding material is critical for keeping a chicken coop clean and healthy. Good bedding absorbs moisture, controls odors, and provides insulation. It also gives your chickens a comfortable surface for walking and nesting. The wrong choice can lead to dampness, smell, and health issues. I have tried many types, and some work much better than others.
Pine shavings are a popular and effective choice. They are highly absorbent, readily available, and have a pleasant scent. Avoid cedar shavings, as their oils can be irritating to chickens’ respiratory systems. Straw is another common option, especially for nesting boxes. It is soft and provides good insulation. However, straw is less absorbent than shavings and can compact quickly, leading to dampness if not changed regularly. Chopped straw is often preferred as it breaks down more easily.
Hemp bedding is gaining popularity. It is extremely absorbent, low dust, and decomposes well in compost. It tends to be more expensive upfront but lasts longer. Sand can also be used, especially in larger coops or runs. It drains well and is easy to “scoop” like a cat litter box. However, sand does not offer insulation and can be dusty if not coarse enough. Regardless of your choice, ensure the bedding is dust-free to protect your chickens’ respiratory health. A thick layer, often 4-6 inches deep, works best for absorption and comfort. Change bedding regularly based on your chosen material and flock size.
Ventilation and Odor Control
Proper ventilation is a silent hero in keeping a chicken coop clean and healthy. It removes moisture, ammonia fumes, and stale air from the coop. Poor ventilation leads to respiratory problems for chickens and creates a breeding ground for bacteria and mold. It also causes strong, unpleasant odors. I learned early on that good airflow is non-negotiable.
Adequate ventilation allows fresh air to enter and stale, moisture-laden air to exit. This does not mean drafts directly on the chickens. Instead, focus on high vents or openings near the roofline to allow hot, humid air to escape. Lower vents or openings near the floor allow fresh air to enter. Screens on openings prevent pests while allowing airflow. In winter, you might need to adjust ventilation to balance fresh air with keeping the coop warm enough. However, never seal up the coop entirely. Ammonia buildup is more dangerous than cold for healthy chickens.
Controlling odors goes hand-in-hand with good ventilation. Ammonia is the primary culprit for coop odor. It comes from chicken droppings. Regular cleaning, especially daily poop patrol and weekly bedding changes, is the best defense against ammonia. Proper bedding absorbs moisture, which helps reduce the breakdown of manure into ammonia gas. If odors persist, consider adding a thin layer of Stall Dry or Sweet PDZ to the bedding. These products absorb ammonia. I avoid using strong chemical air fresheners, as they can harm chickens. Natural solutions and consistent cleaning are key to an odor-free coop.
Pest Prevention Strategies
Pest prevention is a crucial part of keeping a chicken coop clean. A dirty coop attracts rodents, insects, and other unwanted visitors. These pests can spread diseases, steal feed, and cause stress to your flock. Implementing effective pest control measures protects your chickens and maintains coop hygiene. I have found that vigilance is the best defense.
Start with physical barriers. Ensure your coop is secure and free of gaps or holes that pests can use to enter. Hardware cloth (not chicken wire) with a small mesh size, like 1/2 inch or 1/4 inch, should cover all windows and ventilation openings. Bury hardware cloth around the perimeter of the coop, extending at least 6-12 inches down and out, to deter burrowing rodents. Seal any cracks in the coop structure. Rodents can squeeze through surprisingly small openings.
Sanitation is your next line of defense. Store chicken feed in airtight, rodent-proof containers, such as metal trash cans with secure lids. Never leave feed open or scattered on the ground. Clean up spilled feed immediately. Regularly remove old bedding and droppings, as these attract flies and mites. Keep the area around the coop clear of debris, tall weeds, and standing water. These offer hiding places and breeding grounds for pests.
For insect control, consider natural deterrents. Diatomaceous Earth (food grade) can be sprinkled in bedding and dusting areas to help control mites and lice on chickens and in the coop. However, use it sparingly as it can be dusty. Introducing beneficial insects, like certain types of nematodes, can help control fly larvae in composted manure. Inspect your chickens regularly for external parasites. A clean coop and a proactive approach keep pests at bay, creating a healthier environment for your flock.
Seasonal Coop Cleaning Adjustments
Keeping a chicken coop clean requires seasonal adjustments to your routine. The needs of your flock and coop change with the weather. Understanding these shifts helps you maintain optimal conditions year-round. I modify my cleaning process as temperatures rise and fall. This ensures chicken comfort and health in every season.
During warmer months, increased ventilation is paramount. Flies and odors become more prevalent. I ensure all vents are clear and consider adding fans if the heat is extreme. Daily cleaning, especially poop removal, becomes even more important to control flies. I often clean waterers and feeders multiple times a day due to faster spoilage in heat. Deep cleaning is often best done in spring or early summer when temperatures are mild and the coop can dry quickly. Pay extra attention to mite and lice prevention during warm weather as these parasites thrive.
In colder months, moisture management is the biggest challenge. Chickens produce more moisture through respiration in a closed coop. Good ventilation is still necessary to prevent ammonia buildup, but drafts must be avoided. The “deep litter method” can be effective in winter. This involves allowing bedding to build up over several weeks, with daily turning and adding fresh layers. The decomposition process generates a small amount of heat and helps manage moisture. However, it still requires regular spot cleaning of droppings. I also ensure waterers do not freeze, as chickens need constant access to water even in winter. Removing frozen droppings can be tough, so regular scraping before they freeze is helpful. Adjusting your cleaning approach seasonally helps your flock thrive no matter the weather.
Final Thoughts on a Pristine Coop
Achieving and maintaining a pristine chicken coop is an ongoing commitment, but it offers huge rewards. A clean coop means a healthy, happy flock. It reduces the risk of diseases, minimizes unpleasant odors, and deters pests. You also enjoy your chickens more when their home is well-kept. I have seen firsthand the difference a clean environment makes for poultry.
Remember, consistency is key. Daily spot checks, weekly bedding changes, and regular deep cleans form the backbone of a successful coop hygiene plan. Choose absorbent bedding, ensure excellent ventilation, and implement robust pest prevention. These elements work together to create an ideal living space for your chickens. Your efforts contribute directly to their well-being.
Do not get discouraged if your coop gets messy quickly sometimes. That is natural with chickens! Just stick to your cleaning schedule. Adapt your routine as needed for flock size, climate, and specific challenges. By investing time in keeping your chicken coop clean, you are investing in the health and productivity of your beloved birds. Start your comprehensive cleaning routine today. Your flock will thank you for it!
- chicken coop clean
- chicken coop maintenance
- poultry hygiene
- backyard chickens
- coop cleaning tips
- deep cleaning coop
- daily coop chores

Todd Martin
Senior Writer
With over 15 years of experience in home renovation and design, I started HEG to share what I’ve learned with homeowners who want to create spaces that are both beautiful and functional. I’ve always believed in a hands-on approach, and over the years, I’ve picked up practical solutions that actually work. Through HEG, I aim to make home improvement more approachable, sharing real tips that help you create a home you truly love.