· Todd Martin · Home Improvement · 19 min read
How To Install Carpet Start To Finish
How To Install Carpet Start To Finish
Dreaming of fresh, soft floors underfoot? Installing new carpet transforms a room. Many homeowners believe this job is only for professionals. I am here to tell you that you can install carpet yourself. It requires patience and the right steps.
This guide will walk you through the entire process. You will learn about preparing your space. We will cover laying the foundation with tack strips and padding. You will also master cutting, stretching, and finishing the carpet. By following these clear instructions, you can achieve a professional-looking result. Get ready to enjoy your beautiful new carpet.
Takeaway
Installing carpet yourself is a rewarding home improvement project. Follow these steps for success:
- Gather all necessary tools and materials before you begin.
- Thoroughly prepare the subfloor by cleaning and repairing it.
- Install tack strips securely around the room’s perimeter.
- Lay and tape the carpet padding for a comfortable base.
- Unroll and roughly cut your carpet, allowing extra material.
- Use a power stretcher to achieve a tight, wrinkle-free finish.
- Trim excess carpet and tuck edges for a clean look.
- Address seams and transitions carefully for a professional result.
To install carpet from start to finish, prepare the subfloor, install tack strips and padding, lay the carpet, stretch it with a power stretcher, trim excess, and finish edges. Proper tools and a methodical approach ensure a smooth, professional-looking result for your new flooring.
Gathering Your Tools and Materials for Carpet Installation
Starting any home improvement project means having the right supplies. Installing carpet is no different. Gathering your tools and materials before you start saves time. It also helps prevent frustration during the process. I always make a list and check it twice.
Essential Tools for Carpet Installation
You will need a few specialized tools for carpet installation. Some items you might already own. Others are specific to carpeting. You can often rent the more expensive tools from a home improvement store.
- Knee Kicker: This tool helps stretch carpet in small areas or corners. It has a padded end for your knee. The other end grips the carpet.
- Power Stretcher: For large rooms, a power stretcher is a must. It gives maximum leverage to pull the carpet taut. This removes wrinkles and ensures a smooth finish.
- Carpet Trimmer/Cutter: A specialized tool with sharp blades for precise cuts. It works well along walls and for trimming seams.
- Stair Tool/Stair Tucking Tool: This tool helps tuck carpet into tight spaces. It is great for stairs or along tack strips.
- Seaming Iron: If your room needs multiple carpet pieces, a seaming iron joins them. It melts adhesive on seaming tape.
- Seam Roller: After using the seaming iron, this roller presses the seam for a strong bond.
- Slotted Blade Knife/Utility Knife: For rough cuts and general utility. Keep extra blades handy.
- Hammer: For securing tack strips.
- Tape Measure: For accurate measurements.
- Chalk Line: To mark straight lines for cuts.
- Pry Bar: For removing old tack strips or baseboards.
- Stapler (Hammer Tacker or Electric): For securing carpet padding.
Materials You Will Need
Beyond tools, you need the right materials. These form the base for your new carpet. Make sure you calculate amounts accurately to avoid running short.
- Carpet: Choose the style and amount needed. Always buy a little extra for mistakes or future repairs.
- Carpet Padding: This adds comfort and extends carpet life. It also helps with insulation and noise reduction.
- Tack Strips: These wooden strips have sharp pins that grip the carpet. They go around the room’s perimeter.
- Seaming Tape: For joining carpet sections. It has heat-activated adhesive.
- Transition Strips: These create a smooth transition between carpet and other flooring types.
- Nails/Screws: For securing tack strips to the subfloor.
- Duct Tape: For temporarily securing padding seams.
- Safety Gear: Gloves, knee pads, and safety glasses are important.
Having everything ready makes the installation go smoothly. This first step sets you up for success.
Preparing Your Space: Old Carpet Removal and Subfloor Readiness
Before you can install new carpet, you must prepare the area. This involves removing old flooring. It also means getting the subfloor ready. Proper preparation ensures your new carpet lays flat and lasts a long time. I have learned that skipping steps here causes big problems later.
Removing Old Carpet and Padding
Start by clearing the room of all furniture. Remove any doors that open into the room. This gives you a clear workspace.
- Cut the Old Carpet: Use a utility knife to cut the old carpet into manageable strips. Cut along the wall first. Then, make parallel cuts about 2-3 feet wide across the room.
- Pull Up Carpet: Grab a corner of a strip with pliers. Pull it up from the tack strips. Roll up the carpet strips and secure them with tape for easier disposal.
- Remove Padding: The old padding usually comes up easily. It is often stapled down. You might need to use a pry bar for stubborn spots. Roll it up and dispose of it.
- Remove Tack Strips: Use a pry bar to lift the old tack strips. Be careful of the sharp pins. Wear heavy-duty gloves. Collect all nails and staples left behind.
Subfloor Inspection and Repair
The subfloor is the base for your new carpet. It needs to be clean, dry, and flat. Any bumps or dips will show through your new carpet.
- Clean the Subfloor: Sweep and vacuum the entire subfloor thoroughly. Remove all dust, debris, and old staples. A clean surface helps new materials adhere properly.
- Inspect for Damage: Check for any loose boards, squeaks, or water damage.
- Loose Boards: Secure any loose subfloor panels with screws. Squeaky spots often mean loose boards.
- Holes or Gaps: Fill any large holes or gaps with wood putty or patching compound. Let it dry completely.
- Unevenness: Use a leveling compound to fill low spots. High spots might need sanding. A truly flat subfloor is vital.
- Ensure Dryness: The subfloor must be completely dry. Moisture can cause mold or mildew under your new carpet. It can also damage the carpet padding.
This preparation work is crucial. It lays the groundwork for a successful installation. Taking your time here makes the rest of the project much easier.
Laying the Groundwork: Installing Tack Strips and Carpet Padding
With the subfloor ready, you can start installing the foundation for your carpet. This includes tack strips and carpet padding. These components provide the grip and cushioning for your new flooring. Getting this step right is important for the carpet’s appearance and feel.
Installing Tack Strips
Tack strips are thin pieces of wood with angled pins. These pins grab the carpet backing. They hold the carpet securely in place.
- Measure and Cut: Cut tack strips to fit each wall’s length. You can use a hacksaw or tin snips for this.
- Placement: Place tack strips around the perimeter of the room. Position them about two-thirds of the thickness of the carpet away from the wall. For example, if your carpet is 1/2 inch thick, place the tack strip about 1/3 inch from the wall. This gap allows the carpet to tuck neatly between the strip and the wall.
- Secure to Subfloor:
- Wood Subfloor: Nail the tack strips directly into the wood subfloor. Make sure the pins face the wall.
- Concrete Subfloor: Use concrete nails or a hammer drill with appropriate concrete screws. You may need to pre-drill holes. Alternatively, some tack strips come with pre-applied adhesive or can be glued down with construction adhesive before nailing.
- Doorways and Transitions: Do not run tack strips directly across doorways. Instead, stop them about an inch short on each side. A transition strip will cover this gap later.
Laying Carpet Padding
Carpet padding adds comfort and extends the life of your carpet. It also helps with sound dampening and insulation.
- Unroll and Cut: Unroll the carpet padding. Lay it out over the entire subfloor area. Cut pieces to fit the room. Trim around obstacles or corners.
- Fit Edge-to-Edge: Lay the padding pieces edge-to-edge. Do not overlap the padding. Overlaps create bumps under the carpet.
- Secure Padding:
- Staple: Use a hammer tacker or electric stapler to secure the padding. Place staples every 6 inches around the edges and along seams. Also, add staples in the field every 1-2 feet.
- Duct Tape Seams: For extra security, apply duct tape along all padding seams. This prevents the padding from shifting. It also creates a smoother surface for the carpet.
- Around Tack Strips: The padding should butt up against the tack strips. It should not cover them. The tack strips need to be exposed to grip the carpet.
Proper installation of tack strips and padding creates a solid foundation. This step ensures your new carpet will look good and perform well for many years.
Cutting and Seaming New Carpet: First Steps to Placement
Once your subfloor, tack strips, and padding are ready, it’s time to bring in the new carpet. This stage involves careful measurement, precise cutting, and, if needed, expert seaming. Taking your time here ensures a clean, professional finish.
Acclimating Your Carpet
Before you cut or install, let your carpet acclimate. Unroll it in the room where it will be installed. Give it at least 24 hours. This allows the carpet to adjust to the room’s temperature and humidity. It helps prevent shrinking or expanding after installation. I usually unroll it fully or in large sections.
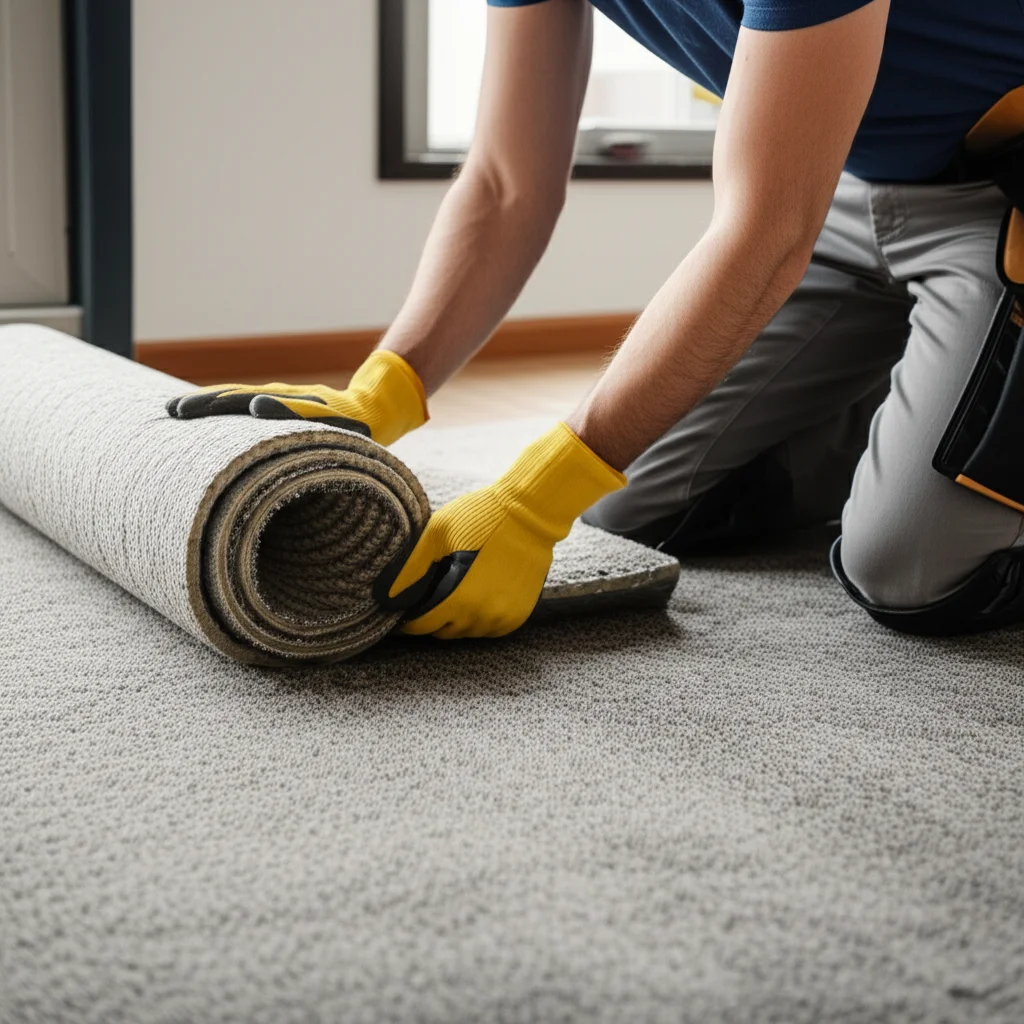
Rough Cuts and Initial Placement
Working with a large roll of carpet can be challenging. Start with rough cuts to make it manageable.
- Measure and Mark: Measure the room’s dimensions. Add 6 inches to both the length and width of your carpet cuts. This extra material gives you room for error. It also allows for stretching and trimming later.
- Unroll and Cut: Carefully unroll the carpet outside the room or in a large open space. Use a chalk line to mark your rough cuts. Cut the carpet with a utility knife from the back. Score it several times for a clean break. Be careful to cut in a straight line.
- Position in Room: Bring the large carpet pieces into the room. Lay them in their approximate positions. Overlap pieces if you need more than one. Ensure the carpet pile runs in the same direction for all pieces. You can check this by running your hand across the carpet. The pile should feel smooth in one direction and rough in the other.
Precise Cutting and Seam Joining
If your room is wider than your carpet roll, you will need to join pieces. This requires careful seaming.
- Overlapping Seams: For a seam, overlap the two carpet pieces by about 3 inches. Make sure the pile direction matches.
- Cutting the Seam: Place a steel straightedge along the overlap. Use a carpet trimmer or utility knife to cut through both layers of carpet. This creates a perfect, tight seam. Some professionals use a specialized seam cutter that cuts both edges at once.
- Applying Seaming Tape: Fold back the carpet edges. Lay a strip of heat-activated seaming tape underneath the seam line. The tape should be centered under the seam.
- Seaming with an Iron: Heat a seaming iron. Place it on the tape and slowly move it along the seam. The heat melts the adhesive. As you move the iron, press the carpet edges together immediately. Use a seam roller to firmly press the seam into the adhesive. This creates a strong, invisible bond. Work in small sections, moving the iron slowly.
- Let it Cool: Allow the seam to cool completely before putting any pressure on it. This ensures the adhesive cures properly.
Accurate cuts and strong seams are crucial for a professional look. This step prepares the carpet for the final stretching and trimming.
Stretching the Carpet: Achieving a Professional, Wrinkle-Free Finish
Once your carpet is roughly laid and any seams are joined, the next critical step is stretching. Stretching removes wrinkles and ensures a tight, smooth, and durable installation. This is where specialized tools truly shine. A properly stretched carpet resists buckling and looks professional for years.
The Importance of Stretching
Many DIY installers might try to skip proper stretching. This is a mistake. Carpet naturally relaxes over time. Without proper stretching, it will eventually buckle, wrinkle, or show ripples. These issues are unsightly and can even be a tripping hazard. Stretching ensures the carpet is held firmly by the tack strips, providing a long-lasting, flat surface.
Using the Knee Kicker
The knee kicker is your primary tool for initial stretching and working in small areas.
- Start in a Corner: Begin in one corner of the room. Place the head of the knee kicker about an inch from the wall, on the carpet.
- Engage Pins: Push down on the handle to engage the carpet’s backing with the kicker’s pins.
- Kick with Your Knee: Strike the padded end of the kicker with your knee. This pushes the carpet forward.
- Secure to Tack Strips: As the carpet moves, press it down onto the tack strips with your hand or a stair tool. The pins will grip the carpet.
- Work Along Walls: Continue working along the wall, about 1-2 feet at a time. Overlap each kick to ensure even stretching.
- Opposite Wall: Stretch towards the opposite wall, securing the carpet as you go.
The knee kicker is great for getting the carpet started and for tight spots. It helps secure the carpet to the first set of tack strips.
Mastering the Power Stretcher
For larger rooms, a power stretcher is essential. It provides much more force than a knee kicker. This tool lets you pull the carpet across the room, getting it drum-tight.
- Set Up: Place the power stretcher’s head on the carpet, near a wall you’ve already secured with the knee kicker. Position the “tail” of the stretcher against the opposite wall, often with a wood block to protect the wall.
- Adjust Length: Adjust the stretcher’s poles to bridge the distance.
- Leverage and Stretch: Push the lever down on the stretcher. This extends the head, pulling the carpet tightly. The pins on the stretcher head grip the carpet.
- Secure and Repeat: While the carpet is taut, use your knee kicker or a stair tool to force the carpet onto the tack strips along the wall. Release the stretcher, move it over a few feet, and repeat the process.
- Pattern for Stretching:
- Start by securing one wall completely.
- Stretch across the room to the opposite wall, securing that side.
- Then, move to the remaining two walls, stretching from the already secured sides.
- Work in a “V” or diagonal pattern across the room to ensure even tension. Stretch from the corners outwards.
A properly stretched carpet will lie flat and feel firm underfoot. This step makes your DIY installation look truly professional.
Finishing Touches: Trimming, Tucking, and Transition Strips
You have laid, seamed, and stretched your carpet. Now come the finishing touches. This stage involves trimming excess material, neatly tucking edges, and installing transition strips. These steps give your new carpet a clean, polished appearance. Precision here makes all the difference.
Trimming Excess Carpet
After stretching, you will have carpet overlapping your walls. This excess needs to be trimmed neatly.
- Use a Carpet Trimmer: A specialized carpet trimmer is ideal for this. It has a guide that runs along the wall. This helps you make a precise cut.
- Work Systematically: Start in a corner. Place the trimmer’s guide against the baseboard or wall. Press down firmly to cut the carpet.
- Cut from the Top: Unlike rough cuts, you will cut from the top of the carpet. This allows for more control and a cleaner edge.
- Corners: For inside corners, make a small relief cut to allow the carpet to lay flat. For outside corners, cut the carpet precisely to fit around the corner.
Tucking Edges
Once trimmed, the carpet edge needs to be tucked securely between the tack strip and the wall.
- Use a Stair Tool or Tucking Tool: This tool has a blunt, angled edge.
- Force Carpet Down: Place the tool’s edge on the trimmed carpet. Push the carpet down into the gap between the tack strip and the wall.
- Work Along Walls: Work along all walls, ensuring the carpet is fully tucked. This hides the raw edge and keeps the carpet from pulling away from the wall.
- Around Obstacles: Be extra careful when tucking around door frames, vents, and other obstacles. You may need to make small relief cuts to allow the carpet to tuck cleanly.
Installing Transition Strips
Transition strips create a smooth seam between your new carpet and other flooring types. This could be tile, hardwood, or laminate.
- Measure and Cut: Measure the width of the doorway or transition area. Cut the transition strip to fit using a hacksaw.
- Types of Strips:
- Z-bar: For transitions to lower hard surfaces. It has a “Z” shape that hooks the carpet edge.
- Reducer: For transitions to lower hard surfaces. Creates a sloped transition.
- Tackless Reducer/Bar: A flat bar with pins that holds the carpet and bridges the gap.
- Threshold: A wider strip, often used at exterior doors or between rooms.
- Secure the Strip:
- Nail-down strips: Pre-drill holes if needed. Nail the strip to the subfloor.
- Adhesive strips: Some strips have peel-and-stick adhesive.
- Snap-in strips: Some have a base piece that secures to the floor. The decorative top piece snaps into it.
- Tuck Carpet: Tuck the carpet neatly into the transition strip. Ensure it is secure and flat.
Finishing touches may seem minor. However, they define the professionalism of your carpet installation.
Caring for Your New Carpet and Troubleshooting Common Issues
Congratulations! You have successfully installed your new carpet. Now, keeping it looking great involves regular care. Even with careful installation, minor issues can arise. Knowing how to care for your carpet and address small problems extends its life and beauty.
Immediate and Long-Term Carpet Care
Caring for your new carpet starts the moment it is down.
- Ventilation: Keep the room well-ventilated for the first 24-48 hours. This helps dissipate any new carpet odors.
- Vacuum Regularly: Regular vacuuming is the most important part of carpet care. It removes dirt and grit before it can settle deep into the fibers. For tips on effective cleaning, consider how to clean a whole room of carpet. I vacuum high-traffic areas several times a week.
- Spot Clean Spills Immediately: Accidents happen. Blot spills with a clean cloth as soon as they occur. Do not rub, as this can spread the stain. Use appropriate carpet cleaning solutions. For stubborn spots, learn how to clean carpet along walls or other affected areas. If you have pets, knowing how to clean pet urine from carpet is especially helpful.
- Professional Cleaning: Have your carpet professionally cleaned every 12-18 months. This removes embedded dirt and allergens.
- Use Area Rugs: In high-traffic zones or under heavy furniture, use area rugs. They protect your carpet from wear. They also help prevent issues like how to get furniture dents out of carpet.
Troubleshooting Common Carpet Issues
Even with the best installation, minor issues can pop up. Knowing how to address them helps keep your carpet looking fresh.
- Ripples or Buckles: If ripples appear, it means the carpet was not stretched enough, or it has relaxed. You might need to re-stretch the affected area with a knee kicker or power stretcher. This often happens in areas with high humidity.
- Loose Seams: If a seam becomes visible or starts to separate, you can try to re-iron it. Use a seaming iron and seaming tape. Carefully lift the carpet edges, apply new tape if needed, and re-iron.
- Frayed Edges: Along walls or transitions, edges can sometimes fray. Apply a small amount of carpet adhesive to the frayed spot. Then, gently press the fibers back into place. You might need to re-tuck the edge using a stair tool. If it’s a doorway issue, exploring how to fix carpet in doorway can provide solutions.
- Odors: New carpet can have a distinct smell. Ventilation usually solves this. For lingering odors, try baking soda. Sprinkle it on, let it sit, then vacuum. If you suspect deeper issues, look into how to keep carpet clean for general advice.
- Damage: For small tears or burns, a patch from leftover carpet scraps can work. This is a common method when considering can you repair existing carpet yourself. Cut out the damaged area. Cut a new piece to match the pile direction. Use carpet adhesive to secure the patch.
Regular care and quick fixes for small issues will ensure your new carpet remains a beautiful addition to your home for many years.
Frequently Asked Questions About Carpet Installation
How long does it take to install carpet in an average room?
Installing carpet in a typical 10x12 foot room can take 4-8 hours for an experienced DIYer. This includes preparation, padding, and stretching. Larger or more complex rooms, like those with many cuts or stairs, will take significantly longer. Plan for a full weekend if it is your first time.
Do I need to remove baseboards before installing new carpet?
Removing baseboards is not strictly necessary, but it gives a cleaner finish. If you remove them, you can tuck the carpet under the baseboard. This hides the cut edge completely. If you leave them on, you will tuck the carpet between the tack strip and the baseboard.
Can I install carpet directly over a concrete floor?
Yes, you can install carpet over concrete. You will need to prepare the concrete first. Ensure it is clean, dry, and level. You must use concrete-specific tack strips and potentially a moisture barrier. A good quality padding is also essential for comfort and insulation on concrete.
Is professional carpet stretching always necessary?
Yes, professional-level stretching is necessary for a lasting installation. Using a power stretcher ensures the carpet is drum-tight. This prevents ripples and buckles over time. A knee kicker alone is not enough for large areas. Renting a power stretcher is a worthwhile investment for a DIY project.
What is the ideal humidity for carpet installation?
The ideal humidity for carpet installation ranges from 35% to 65%. Allowing the carpet to acclimate in the room for 24-48 hours helps it adjust. This prevents expansion or contraction after installation. Stable temperature and humidity prevent future issues like bubbling or gapping.
How much carpet should I buy extra?
It is wise to buy 5-10% more carpet than your exact measurements. This extra material accounts for waste, mistakes, and future repairs. Leftover scraps are valuable for patching small damaged areas later on. Always factor in pattern repeats if your carpet has one.
Conclusion
Installing new carpet yourself is a significant but rewarding project. We have covered the entire process, from getting your tools ready to the final touches. You learned about preparing the subfloor, installing tack strips and padding. We also discussed how to lay, seam, and stretch the carpet for a smooth finish. Finally, you saw how to trim edges and care for your new flooring.
Remember, patience and careful attention to detail are your best assets. Following each step precisely ensures a professional result.
- carpet installation
- DIY carpet
- installing carpet
- home flooring
- carpet guide
- carpet tools
- carpet pad
- tack strips

Todd Martin
Senior Writer
With over 15 years of experience in home renovation and design, I started HEG to share what I’ve learned with homeowners who want to create spaces that are both beautiful and functional. I’ve always believed in a hands-on approach, and over the years, I’ve picked up practical solutions that actually work. Through HEG, I aim to make home improvement more approachable, sharing real tips that help you create a home you truly love.