· Todd Martin · Home Maintenance · 22 min read
How To Clean Sprinkler Valve
Clean Your Sprinkler Valve: A Full Guide to Restoring Flow
A healthy lawn or garden depends on a well-functioning sprinkler system. Over time, sprinkler valves can face issues. Dirt, sediment, and mineral deposits can accumulate inside these vital components. This buildup prevents water from flowing correctly.
Learning how to clean sprinkler valve parts can save you money and keep your landscape vibrant. This guide will walk you through the process. We will cover identifying problems, gathering tools, and performing a thorough cleaning. You will gain the knowledge to maintain your irrigation system effectively.
Takeaway
- Regularly cleaning your sprinkler valve prevents common system failures.
- Identifying valve issues early saves water and protects your landscaping.
- Simple tools and a step-by-step approach make valve cleaning a manageable DIY task.
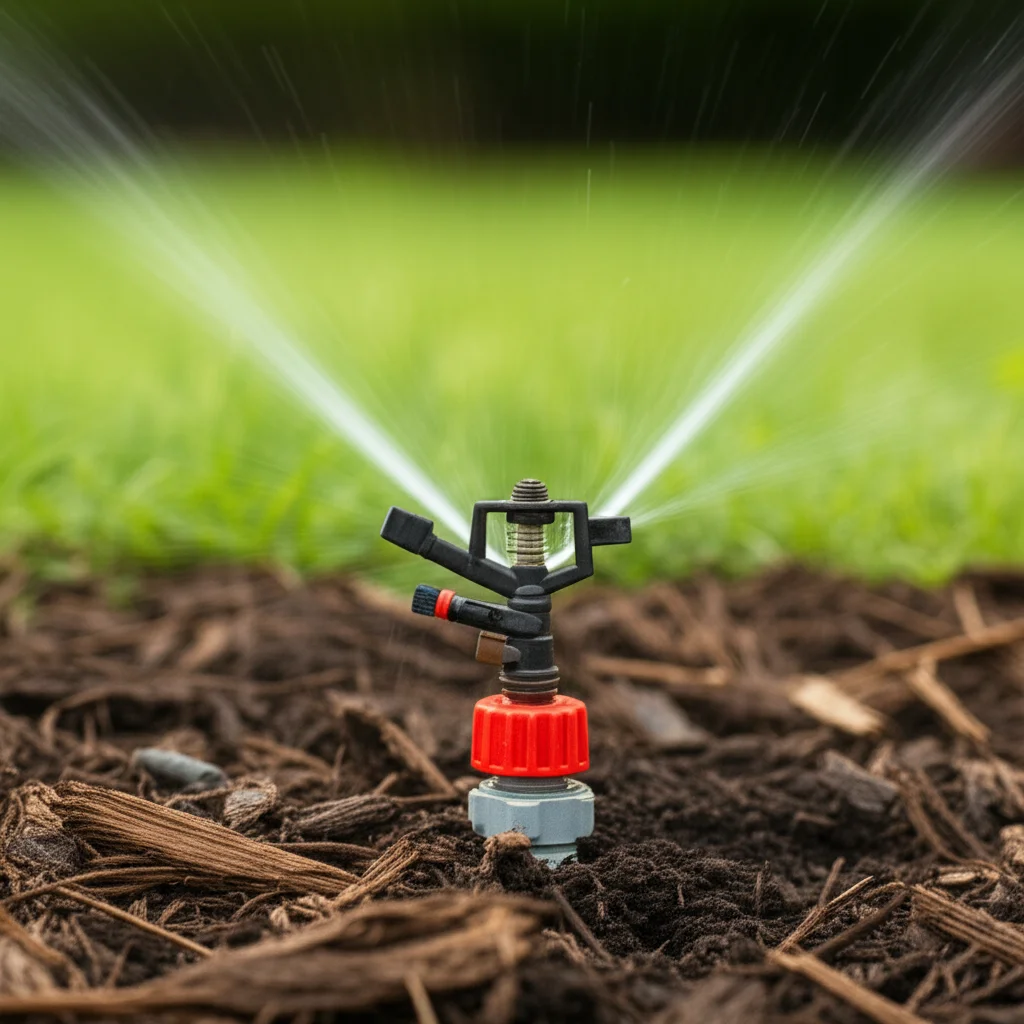
To clean a sprinkler valve, you first turn off the main water supply to your irrigation system. Then, you carefully dig around the valve box to access the valve. You disassemble the valve components, such as the solenoid and diaphragm, and thoroughly rinse away any dirt, debris, or mineral deposits with clean water. Finally, you reassemble the valve and test its function.
Why Your Sprinkler Valve Needs Cleaning: Symptoms and Causes
Sprinkler valves are the heart of your irrigation system. They control water flow to different zones. When a valve malfunctions, your landscape suffers. Recognizing the signs of a dirty or faulty valve helps you act quickly.
Ignoring these signs can lead to dry spots or water waste. It can also cause damage to your pump or other system components. I learned this the hard way with a section of my lawn.
Common Signs of a Clogged Sprinkler Valve
You might notice several issues if your sprinkler valve is dirty. One common problem is a zone that does not turn on. Another sign is a zone that stays on constantly, even after the system shuts off. This suggests the valve cannot close properly.
Low water pressure in a specific zone also indicates a problem. You might see some sprinkler heads barely spraying water. This happens because debris restricts water flow through the valve. Uneven watering across your lawn signals a distribution issue, often linked to valve performance.
What Causes Sprinkler Valve Clogs?
Many factors contribute to valve clogs. The most common cause is sediment in the water supply. Sand, silt, and tiny stones can enter the system, especially if your water comes from a well or an older municipal supply. These particles settle inside the valve.
Mineral deposits are another frequent culprit. Hard water leaves behind calcium and magnesium scale. This scale builds up on valve components. Algae and other organic matter can also grow inside the lines and valves. This is more common in systems drawing from ponds or stagnant water sources. Cleaning water filters regularly can help mitigate some of these issues before they reach your valves.
Rust and corrosion from old pipes or components can also cause blockages. Even small pieces of debris from pipe repairs or renovations can find their way into the valves. Understanding these causes helps you take preventative steps. For instance, addressing sediment out of a well can significantly reduce valve issues.
The Impact of Neglect
Neglecting a dirty sprinkler valve leads to various problems. Your lawn or garden may receive too little or too much water. This causes stress to plants and grass. It can also lead to higher water bills from inefficient watering.
Continuous leaks or constant running water from a faulty valve waste valuable resources. Prolonged issues can damage other parts of your irrigation system. This includes the sprinkler heads themselves, which might break from inconsistent pressure. It can also strain your pump, shortening its lifespan.
Addressing valve clogs promptly maintains system efficiency and extends its service life. I always make sure to check my valves if I notice any changes in my irrigation system’s behavior. Proper maintenance, including learning how to clean sprinkler valve parts, keeps everything running smoothly.
Tools and Materials for Cleaning Sprinkler Valves
Before you begin cleaning your sprinkler valve, gather all necessary tools and materials. Having everything ready saves time and frustration. It also ensures the job gets done safely and efficiently. I always lay out my tools beforehand.
You likely already own many of these items. If not, a quick trip to a hardware store will stock you up. Investing in the right tools makes any home maintenance task simpler.
Essential Tools for Valve Disassembly
You will need several basic hand tools for this project. A sturdy shovel is crucial for digging around the valve box. You might also need a small trowel for more precise digging. This helps avoid damaging underground pipes or wires.
A Phillips head screwdriver is essential for removing the solenoid. Some valves use screws to hold the diaphragm in place. You might also need a flathead screwdriver for prying open certain plastic clips or covers. Adjustable pliers can help loosen stubborn connections, but be gentle.
A wire brush can help clean threads or remove loose debris. You might also want a small bucket or container. This can hold parts during cleaning. It also helps manage any water that drains from the valve.
Cleaning Agents and Supplies
For the actual cleaning, you will need a few simple supplies. Clean water is your primary cleaning agent. A garden hose with good pressure can help rinse away loose dirt. I often use a spray bottle filled with water for targeted rinsing.
For stubborn mineral deposits, white vinegar works wonders. Vinegar is a mild acid that dissolves calcium and lime buildup. You can mix it with water for less severe cases. Cleaning with vinegar is a common, effective method for many household tasks.
A soft brush or old toothbrush helps scrub components gently. Do not use abrasive brushes that might scratch plastic or rubber parts. Cotton swabs or pipe cleaners can reach into small orifices. A clean rag or old towel is useful for wiping parts dry.
Safety Gear and Miscellaneous Items
Safety should always be a priority. Work gloves protect your hands from dirt and potential sharp edges. Safety glasses guard your eyes against splashes or flying debris. These are simple precautions but highly important.
You might want a small container for holding screws and small parts. This prevents them from getting lost in the dirt. A flashlight or headlamp is useful if you are working in low light or deep in a valve box. Finally, have some spare water nearby for cleaning tools and hands.
Having these tools and supplies ready makes the “how to clean sprinkler valve” process straightforward. You will be prepared for any challenge the job might present. I always double-check my list before I start digging.
Safety First: Preparing to Clean Your Sprinkler Valve
Before you start digging or disassembling anything, prioritize safety. Working with water lines and electrical components requires care. Taking proper precautions prevents injuries and protects your irrigation system. I always start by thinking about what could go wrong.
A little preparation goes a long way. It ensures a smooth and secure cleaning process. Do not rush this preliminary stage.
Locating and Accessing the Valve
First, you need to find the problematic sprinkler valve. Most sprinkler valves are housed in green or black plastic valve boxes. These boxes are usually buried flush with the ground. Use your shovel to carefully remove any sod or soil covering the box.
Once located, carefully remove the lid. Be cautious as you do this. Sometimes insects or small animals make their home inside. Clear away any dirt, debris, or roots from around the valve. Ensure you have clear access to all components.
If you have multiple valves in one box, identify the correct one. You can do this by turning on the specific zone. Listen for the valve’s activation sound. Feel the valve body for vibrations when it turns on. Mark it if needed to avoid confusion.
Shutting Off the Water Supply
This is a critical step for your safety and to prevent flooding. You must turn off the main water supply to your irrigation system. This is usually done at a shut-off valve located near your main water meter or a backflow prevention device. Sometimes, there is a dedicated shut-off for the sprinkler system.
Locate this main shut-off valve. Turn the handle or lever until the water supply is completely off. Once you shut off the water, open a sprinkler head at the lowest point in your system. This drains any remaining water from the lines. This releases pressure, preventing a sudden spray when you open the valve.
Verify the water is off by briefly attempting to turn on the affected zone at your controller. No water should flow from the sprinkler heads. This confirms the system is depressurized. This step protects you from unexpected water blasts and prevents significant water waste during cleaning.
Disconnecting Power (If Applicable)
Some sprinkler valves are controlled by an automatic controller. These valves have electrical wiring connected to their solenoids. To avoid electrical shock, disconnect power to the entire sprinkler system controller. This is usually done by unplugging the controller from the electrical outlet.
If your controller is hardwired, find its dedicated breaker in your electrical panel. Flip the breaker to the “off” position. Label it clearly. This ensures no power reaches the valve while you work.
Even low-voltage wires can deliver a shock or damage the controller if short-circuited. Taking this simple step ensures complete safety. I always unplug my controller as a standard procedure. Now you are ready to begin the actual cleaning process safely.
Step-by-Step Guide: Disassembling and Cleaning the Sprinkler Valve
Now that you have prepared, you can begin the detailed cleaning process. This involves careful disassembly, thorough cleaning of components, and inspection. I find that taking my time here prevents issues later. Following these steps helps ensure you effectively clean your sprinkler valve.
Remember to keep track of all parts as you remove them. Lay them out in the order you take them off. This makes reassembly much easier.
Removing the Solenoid
The solenoid is the electrical component on the valve. It activates the valve when the controller sends a signal. First, gently disconnect the two wires leading to the solenoid. You might need to twist the wire nuts counter-clockwise to remove them. Note which wire goes to which terminal if they are color-coded, though often they are interchangeable for solenoids.
Next, unscrew the solenoid itself. It usually threads into the valve body. Turn it counter-clockwise until it comes free. Be careful not to damage the threads. Inside the solenoid, you might find a small plunger or spring. Remove these carefully and inspect them for debris.
Rinse the solenoid and its plunger under clean running water. Check the small opening (port) where the plunger sits. Use a cotton swab or a fine wire to clear any obstructions. Make sure the plunger moves freely. This is a common place for sediment to collect.
Opening the Valve Body
After removing the solenoid, you need to open the main valve body. This allows access to the diaphragm. Sprinkler valves typically have either a series of screws or a large collar that holds the top of the valve in place.
If there are screws, use your Phillips head screwdriver to loosen them. Loosen them evenly, working in a cross pattern. This prevents warping the valve body. Once all screws are loose, carefully lift the top portion of the valve. If your valve has a large threaded collar, simply unscrew it by hand or with channel locks if it’s tight.
Lift the top of the valve off the body. Watch for the diaphragm, a rubber disc, which might be attached to the top or sitting loosely inside. Be careful not to lose any small springs or O-rings.
Cleaning the Diaphragm and Its Seat
The diaphragm is the most common point of failure due to dirt. It is a flexible rubber disc that seals the valve. Inspect it for tears, stiffness, or cracks. If it looks damaged, it might need replacement. Often, it just has grit or mineral deposits on its surface.
Carefully remove the diaphragm from the valve. Rinse both sides thoroughly with clean water. Use a soft brush or your fingers to gently rub off any dirt, sand, or grit. If you see white, crusty deposits (mineral scale), soak the diaphragm in a solution of white vinegar and water for 15-30 minutes. Cleaning with vinegar is effective for dissolving these deposits.
Next, focus on the valve seat inside the main valve body. This is where the diaphragm rests to create a seal. Use your fingers or a clean rag to wipe away any debris. Inspect the small port in the center of the valve seat. This “bleed port” allows water to move above the diaphragm. It is crucial for valve operation. Clear this port using a small piece of wire or a cotton swab. Make sure it is completely open. Cleaning a toilet fill valve also involves checking and cleaning small ports for proper water flow.
Clearing Internal Passages
With the diaphragm removed, you can see the internal water passages of the valve. Look for any accumulated dirt, sand, or debris. Use a garden hose to flush out these passages. Direct the water into the inlet port and let it flow out the outlet.
You can also use a soft brush to scrub the inside surfaces. Pay attention to any narrow channels or corners where sediment might collect. Ensure all internal surfaces are free from obstructions. This is a core part of how to clean sprinkler valve internals effectively.
Check the screen or filter, if your valve has one. Some valves have a small mesh screen at the inlet. Remove and clean this screen thoroughly. A clogged screen restricts flow, even if other parts are clean. Cleaning a filter in a dishwasher shares a similar principle: remove debris to restore flow.
Thorough cleaning of each component ensures your valve operates correctly. Take your time to inspect everything for wear or damage. This step is crucial for preventing future issues.
Targeting Common Issues: Solenoid and Diaphragm Cleaning
Even after general cleaning, specific valve components might need extra attention. The solenoid and diaphragm are the most common parts to cause problems. Addressing their specific issues ensures your valve works perfectly. I often find these are the culprits when a valve acts up.
Properly cleaning these parts is key to restoring full functionality. It prevents the need for costly replacements. These steps are vital when you clean sprinkler valve parts.
Deep Cleaning the Solenoid
The solenoid’s function is to pull a small plunger, allowing water to flow to the top of the diaphragm. This pressure change opens the valve. If the solenoid’s internal port is blocked, the valve will not open or close correctly.
After removing the solenoid, inspect its small plunger and spring. Make sure the plunger moves freely up and down inside the solenoid body. If it sticks, gently clean its surface with a soft cloth. Do not use abrasive cleaners. They can damage the delicate parts.
The tiny hole at the bottom of the solenoid, where the plunger sits, is critical. Use a small piece of wire, like a paperclip straightened out, to carefully poke through this hole. Ensure it is completely clear of debris. Rinse the solenoid under a stream of water. You can also soak the solenoid in a shallow dish of white vinegar for 15 minutes if you suspect mineral buildup. This helps dissolve any scale. Make sure to rinse it thoroughly with clean water afterward.
Restoring Diaphragm Flexibility and Seal
The diaphragm acts as a flexible seal. It opens and closes the valve based on water pressure. Over time, it can become stiff, cracked, or coated with mineral deposits. These issues prevent it from sealing properly or flexing correctly.
Examine the diaphragm closely for any signs of physical damage. Look for tears, nicks, or excessive wear. If it has any damage, you should replace the diaphragm rather than trying to clean it. A damaged diaphragm cannot create a proper seal.
For mineral deposits, a vinegar soak is highly effective. Place the diaphragm in a bowl of undiluted white vinegar for 30 minutes to an hour. The vinegar will help dissolve calcium and lime deposits. You might see bubbling as the acid reacts with the minerals. After soaking, gently scrub the diaphragm with a soft brush or old toothbrush. Rinse it thoroughly with clean water. Ensure all vinegar residue is gone. Cleaning mold with vinegar also demonstrates its cleaning power.
Addressing the Bleed Port and Pressure Regulators
Many valves have a small “bleed port” or “weep hole” that helps the valve open and close. This small opening is usually near the solenoid or on the valve’s top. It allows water to move into or out of the chamber above the diaphragm.
This tiny port is very susceptible to clogging. Use a small, thin wire or a cotton swab to clear it out. Make sure water can flow freely through it. A blocked bleed port will prevent the valve from opening fully or closing tightly.
Some advanced sprinkler valves include pressure regulators. These typically do not require cleaning in the same way. However, ensure the internal passages around them are clear. If you suspect a pressure regulator issue, it might be a replacement rather than a cleaning task. Knowing how to clean sprinkler valve parts includes understanding which parts need special attention.
By focusing on these key components, you address the most common reasons for valve failure. This specific attention to the solenoid and diaphragm makes your cleaning efforts more successful.
Reassembly and Testing Your Cleaned Sprinkler Valve
After thoroughly cleaning all components, it is time to reassemble your sprinkler valve. This step requires precision. Incorrect reassembly can lead to leaks or continued malfunction. I always double-check each connection.
Following these steps ensures your valve works as it should. Proper reassembly is just as important as the cleaning itself. This is the final stage of how to clean sprinkler valve components and get them back in service.
Careful Reassembly of Components
Start by placing the cleaned diaphragm back into the valve body. Ensure it is seated correctly. The diaphragm usually has a specific orientation. Some have small tabs or a keyway that aligns with the valve body. Make sure it sits flat and wrinkle-free on the valve seat. A misaligned diaphragm will cause leaks or prevent proper sealing.
Next, carefully place the top portion of the valve over the diaphragm. Align the screw holes or the threads for the collar. If your valve has screws, insert them and tighten them by hand first. Then, use your screwdriver to tighten them evenly in a cross pattern. This ensures even pressure and prevents cracking the plastic. Do not overtighten, as this can strip the plastic threads.
Reinstall the solenoid. Screw it back into its port on the valve body. Tighten it gently by hand. Ensure it is snug but not overly tight. Over-tightening can damage the solenoid or valve body threads.
Reconnecting Wiring and Water Supply
Once the valve is physically reassembled, reconnect the electrical wires to the solenoid terminals. Twist the wire nuts tightly to ensure a secure connection. Make sure there is no exposed wire. Exposed wires can lead to shorts or corrosion.
Now, you can turn the main water supply back on to your irrigation system. Do this slowly. Listen for any sounds of water rushing or leaks around the newly assembled valve. A slow turn-on helps to prevent water hammer, which is a sudden pressure surge.
After turning on the water, inspect the valve thoroughly for any leaks. Look at the top of the valve, around the solenoid, and where the valve connects to the pipes. A small drip can indicate an improperly seated diaphragm or loose connection.
Testing the Valve’s Operation
With the water back on, it is time to test the valve. Go to your sprinkler controller. Manually activate the zone that your cleaned valve controls.
Observe the sprinkler heads in that zone. They should turn on with good, even pressure. Look for consistent spray patterns. The valve should open fully and quickly.
After a few minutes, manually turn off the zone at the controller. The valve should close completely. Listen for the sound of the water stopping. Confirm that the sprinkler heads stop spraying and no water leaks from them. If the zone continues to run or drips, the valve might still have an issue. It could be a minor leak, or perhaps the diaphragm needs readjustment. This might mean you need to repeat parts of the process.
It is common to need a small adjustment or re-check after the first test. I often find a tiny leak that needs a quarter-turn more on a screw. Proper testing confirms your “how to clean sprinkler valve” efforts were successful.
Preventative Maintenance for Your Sprinkler System
Cleaning your sprinkler valve is a great repair skill. However, preventing clogs in the first place saves you time and effort. Regular preventative maintenance keeps your entire irrigation system running smoothly. I believe proactive care is always better than reactive repairs.
Implementing a maintenance schedule helps avoid common issues. It extends the life of your system. This approach prevents the need for frequent valve cleaning.
Regular Flushing of Lines
One simple preventative measure is to flush your sprinkler lines annually. This helps remove accumulated sediment before it can cause clogs. At the end of the watering season or before the first freeze, open the drain valves at the lowest points in your system. This allows water and any collected debris to flush out.
You can also run each zone for a few minutes. While the zone is running, manually open the bleed screw on each valve for a few seconds. This allows a quick burst of water to flush through the valve’s internal passages. This can dislodge small particles before they become a problem.
For systems with frequent sediment issues, consider installing a larger main filter. A quality water filter at the main water supply can significantly reduce the amount of grit entering your system. This protects not only your valves but also your sprinkler heads.
Inspecting Your Water Source
The quality of your water source directly impacts your sprinkler valves. If you use well water, it might contain more sand, silt, or mineral content. Regularly inspect your well’s sediment filter if it has one. Cleaning sediment out of a well is a proactive step that protects your entire water system, including sprinklers.
For municipal water, while usually cleaner, mineral buildup (hard water) can still be an issue. If you live in an area with hard water, consider using vinegar during routine valve inspections. A quick rinse with a vinegar solution can prevent scale from forming on valve components. Cleaning a water inlet valve on a washing machine also benefits from hard water considerations.
Winterization and Spring Start-Up
Proper winterization is crucial for preventing damage to your valves. In cold climates, water left in the lines and valves can freeze and expand. This causes cracking and severe damage. Blow out your system with an air compressor or have a professional do it. This ensures all water is removed from pipes and valves.
In the spring, when you reactivate your system, turn on the water slowly. This helps to purge air slowly and reduces the risk of water hammer. Briefly run each zone to ensure all components are working correctly. This is a good time for a visual inspection of your valves for any signs of leaks or issues that might have developed over winter.
By following these preventative tips, you significantly reduce the likelihood of valve clogs. This proactive approach saves you time, money, and the hassle of frequent repairs. Your knowledge of how to clean sprinkler valve issues is valuable, but prevention is even better.
FAQ Section
How often should I clean my sprinkler valves?
The frequency depends on your water quality. If you have hard water or well water with sediment, you might need to inspect and clean valves annually. For cleaner municipal water, every 2-3 years might suffice. Pay attention to any signs of malfunction; these indicate an immediate need for cleaning.
What are the signs of a dirty sprinkler valve?
Common signs include a zone that won’t turn on or won’t turn off. You might also notice low water pressure in specific zones. Uneven watering or sections of your lawn drying out are also indicators. These issues suggest debris or mineral buildup is affecting valve operation.
Can I clean the sprinkler valve without removing it from the ground?
Yes, in most cases, you can clean the valve components without fully digging up the entire valve body. You will need to dig enough to access the valve box and unscrew the top of the valve to reach the internal parts. This avoids disturbing pipe connections, making the process simpler.
Is it better to clean or replace a faulty sprinkler valve?
Cleaning is often the first and most cost-effective step. Many valve issues stem from debris or mineral buildup that cleaning can resolve. If, after a thorough cleaning, the valve still malfunctions or shows signs of physical damage like cracks, then replacement is the better option.
Can I use household cleaners other than vinegar?
It is best to stick to clean water and white vinegar for cleaning sprinkler valve components. Strong chemical cleaners can damage the rubber diaphragm, seals, or plastic valve body. Vinegar is effective at dissolving mineral deposits without harming the materials.
What if my sprinkler valve keeps getting clogged?
If clogs are a recurring problem, consider installing a pre-filter for your irrigation system. This filter will catch sediment before it reaches your valves. You may also need to investigate your water source for excessive sediment or mineral content. Regular flushing of the lines can also help mitigate frequent clogs.
Conclusion
Understanding how to clean sprinkler valve components is a vital skill for any homeowner. It allows you to maintain your irrigation system effectively. You can restore water flow and keep your landscape thriving. We discussed identifying common problems like low pressure or zones not turning on. We then covered gathering the right tools.
The process involves carefully shutting off water and power for safety. Disassembling the valve, including the solenoid and diaphragm, allows access to the problem areas. Thoroughly cleaning these parts, especially targeting sediment and mineral buildup, makes a significant difference. Reassembly requires care and precision. Finally, testing the valve ensures it works properly.
Remember, prevention is key. Regular maintenance, such as flushing lines and inspecting your water source, minimizes future clogs. By taking these proactive steps, you extend the lifespan of your sprinkler system. You also ensure your lawn receives the consistent watering it needs. Take charge of your outdoor spaces today! Keep your sprinkler system operating at its best with regular care.
- clean sprinkler valve
- sprinkler maintenance
- irrigation system
- valve repair
- clogged sprinkler
- water pressure
- diy home repair

Todd Martin
Senior Writer
With over 15 years of experience in home renovation and design, I started HEG to share what I’ve learned with homeowners who want to create spaces that are both beautiful and functional. I’ve always believed in a hands-on approach, and over the years, I’ve picked up practical solutions that actually work. Through HEG, I aim to make home improvement more approachable, sharing real tips that help you create a home you truly love.