· Todd Martin · Furniture Assembly · 12 min read
How To Assemble A Bunk Bed With Stairs
Assemble a Bunk Bed with Stairs: A Step-by-Step Guide
Bringing new furniture into your home can feel exciting. Yet, the thought of assembling a bunk bed with stairs might bring a bit of dread. I understand this feeling completely. These pieces often look complex with many parts.
However, with the right approach, building your bunk bed can be a smooth process. You can create a safe and functional sleeping space for your family.
This article will guide you through each stage of bunk bed assembly. We will cover everything from unpacking to the final safety checks. You will learn about preparing your space and organizing parts.
We will detail building the bed frames, integrating the stairs, and securing the entire structure. My goal is to make this task simple and manageable for you. By the end, you will have a sturdy bunk bed ready for use.
Takeaway
Assembling a bunk bed with stairs requires careful planning and execution.
- Organize and Prepare: Clear your workspace and identify all parts.
- Follow Instructions: Adhere strictly to the manufacturer’s manual.
- Build Systematically: Assemble the lower bed, then the upper, then the stairs.
- Prioritize Safety: Secure all connections and anchor the bed to the wall.
- Double-Check: Confirm all screws are tight and the structure is stable.
To assemble a bunk bed with stairs, first prepare your area and organize all parts from the box. Then, follow the provided instructions to build the lower bed frame, attach the upper frame, and secure the stair unit. Finally, install safety rails and anchor the bed to the wall for maximum stability and safety.
Getting Ready: Essential Pre-Assembly Steps
Before you begin the exciting task of assembling your new bunk bed with stairs, preparation is key. I always start by clearing my workspace. You will need enough room to move around the bed frame parts freely. This means moving other furniture or items out of the way. A clear area prevents accidents and makes the process much more efficient.
Next, find your tools. Most bunk beds come with an Allen wrench. However, I often find that having my own Phillips head screwdriver and a rubber mallet makes assembly easier. A drill with appropriate bits can also speed up the process, but be careful not to overtighten screws. Safety glasses and gloves are also good to have on hand to protect yourself.
Unpacking the box comes next. Carefully remove all components and lay them out. I like to group similar items together. This includes all the long rails, short rails, slats, and hardware bags. Compare everything against the parts list in your instruction manual. This step ensures you have all necessary pieces before you start building. It is frustrating to get halfway through assembly only to discover a missing bolt. If anything is missing or damaged, contact the manufacturer immediately. Organizing everything saves time and reduces stress.
Building the Foundation: Assembling the Lower Bunk Frame
The lower bunk frame is the foundation of your entire bunk bed with stairs. I find it best to start here to establish stability. Begin by identifying the headboard and footboard pieces for the lower bed. These are usually the largest frame components. You will connect these with the side rails.
Most bunk bed designs use specific bolts and nuts for these connections. Refer to your instruction manual for the correct hardware. Insert the bolts through the pre-drilled holes in the side rails and into the headboard/footboard. Gently tighten these connections with your Allen wrench or screwdriver. Do not fully tighten them yet. Leaving them slightly loose allows for minor adjustments later. This flexibility helps align other parts more easily.
Once the main frame is together, you will install the support slats. These slats hold the mattress in place. They usually attach to ledges on the inside of the side rails. Some slats screw directly into the frame, while others may just rest on pins. Ensure they are evenly spaced and secure. This creates a solid base for the lower mattress. A strong foundation ensures the entire bunk bed is stable. You can learn more about building foundations with storage by looking into how to build a twin platform bed with storage underneath.
Constructing the Upper Bunk: Preparing for Elevation
With the lower bunk complete, it is time to focus on the upper bunk frame. This part follows a similar assembly process to the lower one. You will again identify the headboard and footboard sections for the top bed. Connect these pieces with their respective side rails using the appropriate hardware. Remember to leave the bolts slightly loose initially.
The upper bunk often includes important safety features. These usually involve specific rail extensions or brackets for attaching the safety rails later. Make sure you orient these pieces correctly according to your manual. Incorrect placement can compromise the safety of the top sleeper. I always double-check these sections.
After the frame is together, install the mattress support slats for the upper bunk. Just like the lower bunk, these slats need to be secure and evenly distributed. They provide the necessary support for the top mattress. A stable slat system is essential for both comfort and safety. This step ensures the upper sleeping area is ready for use. Ensuring your bed frame is stable is important for any bed, including a bunk bed. You can explore how to make a metal bed frame more stable for general bed stability tips.
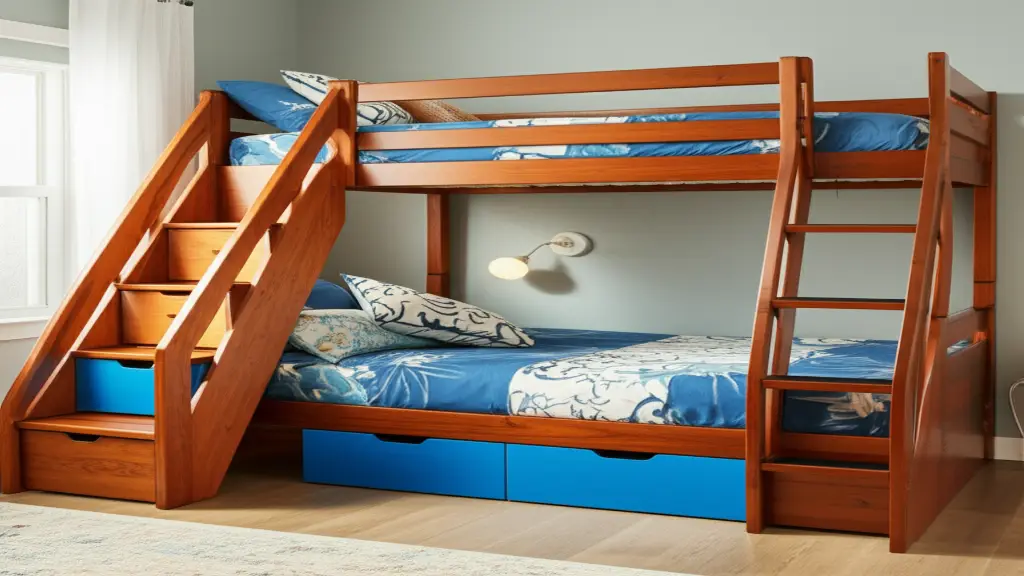
Integrating the Bunk Bed Stairs or Storage Unit
The stairs are what make your bunk bed unique and often more functional. This section is crucial for both access and safety. Bunk beds with stairs usually come with a separate stair unit. This unit might include built-in storage drawers or shelves, which is a great space-saving feature. My kids love having these extra storage options.
First, assemble the stair unit itself. This involves connecting the side panels, treads (the steps), and any drawer components. Follow your manual’s specific instructions for this. Some stairs slide together, while others require screws or dowels. Pay close attention to the orientation of each piece. Incorrect assembly can make the stairs unstable or prevent drawers from opening correctly.
Once the stair unit is complete, you will attach it to the bunk bed frame. Most designs have specific connection points on the side of the bed. These points usually align with pre-drilled holes on the stair unit. Use the designated bolts and brackets to secure the stairs firmly to the bunk bed. This connection needs to be very strong. The stairs provide access to the upper bunk, so they must be completely stable. Some stair units might also include wall anchors. If yours does, plan to use these during the final securing phase. This is similar to how a loft bed might be secured for extra weight capacity. For more on strengthening structures, check out how to make a loft bed hold more weight.
Connecting the Upper and Lower Bunks
This is the moment where your bunk bed truly takes shape. You will now lift the assembled upper bunk frame and place it onto the lower bunk. This step often requires two people. The upper bunk usually has dowels or specific slots that fit into corresponding holes on the lower bunk’s headboards and footboards. Carefully align these points.
Once aligned, gently lower the upper bunk into place. Ensure it sits flush and stable on the lower frame. Next, you will secure the two sections together. Most bunk beds use long bolts that pass through the upper and lower frames. These bolts effectively lock the two beds into a single, sturdy unit. Tighten these bolts firmly but avoid overtightening which could damage the wood or metal.
After connecting the main frames, ensure the entire structure is plumb and level. Small adjustments to the earlier loose bolts might be necessary now. Once everything is aligned, go back and fully tighten all the bolts on both the upper and lower frames. This step solidifies the entire bed. A tight, well-connected frame provides the stability your bunk bed needs. When taking apart beds, understanding these connections is key. For example, how to take apart a wooden bed frame with screws shows how these connections work in reverse.
Installing Safety Rails and Final Checks
Safety rails are critical for the upper bunk. Do not skip this step. These rails prevent falls and provide peace of mind. Most bunk beds come with a full-length rail for the side against the wall and a shorter rail for the side with the stairs or opening. Attach these rails securely to the upper bunk frame using the provided hardware. Ensure they are at the correct height, as specified in your manual. A properly installed safety rail is paramount for anyone sleeping on the top bunk.
After the safety rails are in place, it is time for the final stability checks. Gently rock the entire bunk bed structure from side to side. It should feel solid and not wobble. If there is any movement, re-examine all connections. Tighten any loose bolts you find. Sometimes, an extra turn on a bolt can make a big difference.
For maximum safety, anchor the bunk bed to a wall. Many manufacturers include anti-tip kits for this purpose. I always recommend using them. Locate a wall stud and use the provided straps or brackets to secure the top of the bunk bed to the wall. This prevents the bed from tipping over, especially if a child climbs or plays on it. This is a crucial step for preventing accidents. Securing any elevated bed to the wall greatly improves safety, similar to how to secure a metal loft bed to the wall.
Finally, place your mattresses on the bunk bed. Ensure the upper mattress is not too thick. The top of the mattress should be well below the top of the safety rail, typically leaving at least 5 inches of rail clearance above the mattress. This ensures the safety rails can effectively do their job. Once the mattresses are on, your bunk bed with stairs is ready for use. Remember to regularly check all connections for tightness over time, especially with active children.
Troubleshooting Common Assembly Issues
Even with careful planning, assembly can present challenges. One common issue is misaligned holes. If bolt holes do not line up perfectly, try loosening all connected bolts slightly. This often provides enough wiggle room to fit the stubborn bolt. Then, tighten everything back down. Sometimes, a gentle tap with a rubber mallet can help align wooden pieces, but be careful not to damage the material.
Another frequent problem is missing or damaged parts. As I mentioned earlier, check your parts list carefully before starting. If you discover a missing screw or a broken piece during assembly, stop. Contact the manufacturer’s customer service immediately. Most companies are good about sending replacement parts quickly. Do not try to substitute parts, as this can compromise the bed’s structural integrity and safety.
Finally, you might encounter stability issues after initial assembly. If the bunk bed wobbles, review the tightening of every bolt. Start from the bottom and work your way up. Ensure all connections are snug. Also, confirm the bed is on a level surface. An uneven floor can cause wobbling. If all bolts are tight and the floor is level, consider if you used the correct hardware for each joint. Sometimes a slightly longer or shorter bolt can look similar but not provide adequate grip. When positioning your furniture, even after assembly, proper moving techniques can help. For instance, knowing how to move a bed without taking it apart can be helpful if you need to reposition the bed in the room.
Frequently Asked Questions
How long does it typically take to assemble a bunk bed with stairs? Assembly time varies based on the bunk bed’s complexity and your experience. For a bunk bed with stairs, expect to spend between 2 to 4 hours. Having a second person can significantly reduce this time. It also makes lifting the upper bunk much safer and easier.
Do I need special tools to assemble a bunk bed with stairs? Most bunk beds include the necessary Allen wrenches. I recommend having a Phillips head screwdriver and a rubber mallet. A drill with hex bits can speed things up, but use it carefully to avoid overtightening. No specialized tools are usually required.
Can one person assemble a bunk bed with stairs alone? While some parts, like the lower frame, can be assembled by one person, lifting and connecting the upper bunk is much safer with two people. I strongly recommend having a helper for this crucial step. It reduces the risk of injury and simplifies alignment.
How can I ensure the bunk bed is truly stable and safe after assembly? After assembling, gently shake the entire bed to check for wobbling. Tighten all bolts securely, then recheck. Always use the provided anti-tip kit to anchor the bed to a wall stud. Ensure the top mattress is not too thick, maintaining at least 5 inches of safety rail clearance.
What is the maximum mattress height for the upper bunk? The maximum mattress height for the upper bunk varies by model, but a general rule is that the top of the mattress should be at least 5 inches below the top of the safety rail. This ensures the guardrail remains effective. Always check your specific bunk bed’s manual for precise recommendations.
Are bunk beds with stairs safer than those with ladders? Many parents find bunk beds with stairs safer, especially for younger children. Stairs provide a wider, more stable climbing surface and often include handrails. The integrated storage in stair units also adds extra functionality, making them a popular choice. Cleaning the stairs is easy, similar to how to clean wood stairs.
Conclusion
Assembling a bunk bed with stairs might seem like a big project at first. However, by taking it one step at a time, you can successfully build a sturdy and safe sleeping solution for your home. We covered everything from preparing your space and identifying parts to constructing the frames and securing the unique stair unit. Remember, patience and adherence to the manufacturer’s instructions are your best tools.
Always prioritize safety during the assembly process and after. Double-check every bolt, use the wall anchoring kit, and ensure proper mattress placement. A bunk bed with stairs offers incredible space-saving benefits and often includes valuable storage. My hope is that this guide has simplified the process for you. Now, you can confidently assemble your bunk bed with stairs, creating a functional and enjoyable space for your children. Get ready to enjoy the extra room!
- bunk bed assembly
- bunk bed with stairs
- furniture installation
- DIY bed
- kids room safety
- space-saving beds
- bed construction

Todd Martin
Senior Writer
With over 15 years of experience in home renovation and design, I started HEG to share what I’ve learned with homeowners who want to create spaces that are both beautiful and functional. I’ve always believed in a hands-on approach, and over the years, I’ve picked up practical solutions that actually work. Through HEG, I aim to make home improvement more approachable, sharing real tips that help you create a home you truly love.