· Katria Melrose · Home Improvement · 21 min read
How Many Feet Of Carpet For 13 Stairs
How Many Feet Of Carpet For 13 Stairs: Your Complete Guide
Planning to carpet your stairs is a smart home improvement project. You want to know exactly how many feet of carpet for 13 stairs you will need. Getting the right amount saves money and prevents delays. I understand this process can seem tricky, but it is simpler than you think with proper guidance.
This guide helps you measure accurately for 13 stairs. We will cover different stair types and carpet styles. You will learn the correct formulas and what extra factors to consider. We will also discuss essential tools and offer tips for a smooth installation. Let us make your stairs look great without extra trips to the store.
Takeaway
- Measure each step’s tread, riser, and nose for accuracy.
- Calculate total linear feet per step, then multiply by 13.
- Add 10-20% extra carpet for cuts, mistakes, and pattern repeats.
- Choose between full coverage or a stair runner based on your style and measurement needs.
- Consider professional installation for complex stairs or if you lack experience.
Clear Answer: How Many Feet Of Carpet For 13 Stairs
For 13 standard stairs, you typically need between 65 to 80 linear feet of carpet. This range accounts for average step dimensions (around 10 inches for tread and 7 inches for riser) and includes about 10-20% extra for waste and proper cuts. Exact measurements depend on your specific stair dimensions and carpet style.
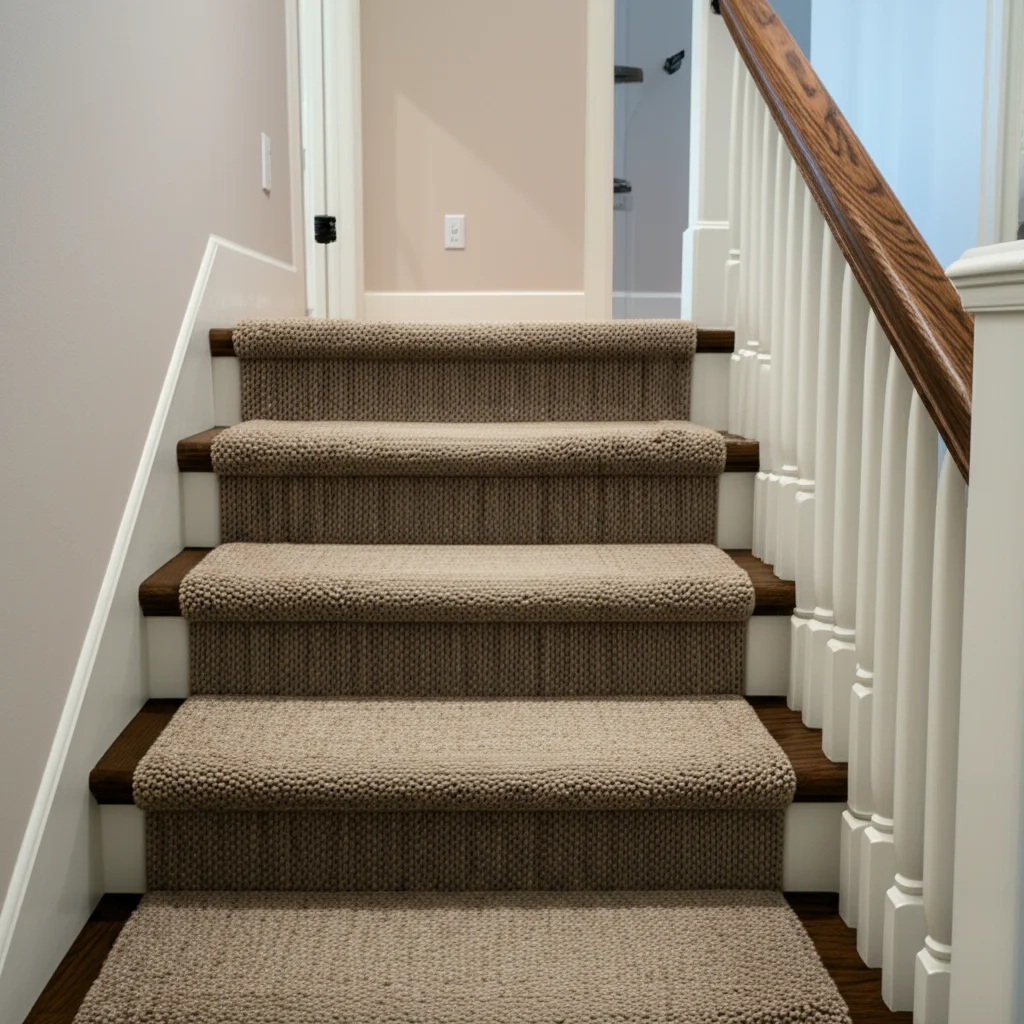
Understanding Stair Dimensions For Accurate Carpet Calculation
Knowing your stair dimensions is the first step to buying the right amount of carpet. Each part of your stair contributes to the total carpet needed. Incorrect measurements lead to either too much waste or not enough carpet. I recommend taking your time with this part.
Key Parts of a Stair
- Tread: This is the flat part of the step where you place your foot. You walk on the tread.
- Riser: This is the vertical part of the step. It connects one tread to the next.
- Nosing (or Nose): This is the part of the tread that hangs over the riser. It adds depth and a finished look to the stair. Carpet must cover this part smoothly.
You need to measure each of these parts precisely. Even small differences can add up across 13 stairs. Use a rigid tape measure for accuracy.
How to Measure Each Step
Begin by measuring one typical step. If your stairs are consistent, you can use these numbers for all 13. If your stairs vary, measure each step individually.
- Measure the Tread: Place your tape measure from the back of the tread to the tip of the nosing. Write down this number.
- Measure the Riser: Measure from the top of the tread down to the top of the next tread (or to the floor for the bottom riser). This is the height of your riser. Record this number.
- Measure the Width: Measure the width of your stair from one side to the other. This measurement helps determine the carpet roll width you need.
Add the tread measurement and the riser measurement for one step. This gives you the linear length of carpet needed for a single step. For example, if your tread is 10 inches and your riser is 7 inches, one step needs 17 inches of carpet length. We will convert this to feet later.
Types of Stair Carpeting: Full Coverage vs. Runners
When you decide to carpet your stairs, you have two main style choices. You can opt for full coverage carpet or a stair runner. Each option affects how you measure and how much carpet you buy for your 13 stairs. Think about the look you want to achieve and the practicality for your home.
Full Coverage Stair Carpeting
Full coverage means the carpet covers the entire width of each stair tread and riser. It goes from wall to wall. This style offers maximum sound dampening and slip resistance. It also creates a seamless, uniform look.
For full coverage, you use the full width of your stairs in your calculations. If your stairs are 36 inches wide, your carpet needs to be at least that wide. Sometimes, carpet comes in standard widths like 12 or 15 feet. You cut the carpet strips to fit each step perfectly. This method often generates more waste than a runner. However, it provides complete protection for the wood underneath. If you are covering existing stairs that might be damaged, full coverage is a great choice. You can learn more about how to cover existing stairs or even how to cover ugly carpet on stairs if you are replacing old material.
Stair Runners
A stair runner is a long strip of carpet installed down the center of your stairs. It leaves a portion of the original stair material visible on either side. Runners add a decorative touch while still providing comfort and safety. They are popular for stairs with beautiful hardwood.
When measuring for a runner, you still measure the tread and riser length for each step. However, you only need to choose a specific width for the runner. Common runner widths are 27 or 32 inches. You typically buy a continuous roll for runners. This often means less cutting and potentially less waste compared to full coverage. You will need to consider how the runner will be secured. Sometimes, people combine runners on very wide stairs. If you want to know more about this, you can check out how to combine carpet runners on stairs. Runners require precise installation to ensure they stay straight and secure.
Choosing between full coverage and a runner depends on your aesthetic preference and practical needs. Both options work well for 13 stairs, but the measurement approach differs.
The Formula: Calculating Carpet For Each Step
Now, let us put those measurements into action. Calculating the exact amount of carpet for 13 stairs involves a simple formula. We will break it down step by step. This helps you get a precise number for your carpet purchase.
Step-by-Step Calculation for Linear Feet
You already measured the tread and riser of one step. Now, add those two measurements together. This total represents the length of carpet needed for one step to cover both the horizontal and vertical parts.
Step 1: Measure a Single Step.
- Tread length (T) + Riser height (R) = Length per step.
- For example: 10 inches (Tread) + 7 inches (Riser) = 17 inches per step.
Step 2: Multiply by the Number of Stairs.
- Take your length per step and multiply it by 13.
- Using our example: 17 inches/step * 13 stairs = 221 inches total length.
Step 3: Convert Inches to Feet.
- There are 12 inches in a foot. Divide your total inches by 12.
- 221 inches / 12 inches/foot = 18.42 feet.
This number, 18.42 feet, is the base linear footage for one stair width. This is if you are using a continuous roll cut specifically for each step. This calculation is a good starting point. It provides the bare minimum needed without accounting for waste or specific installation methods. For a more detailed guide on similar calculations, you can explore resources like how much carpet do i need for 12 stairs, which provides similar measurement principles.
Considering Nosing Overhang
The nosing is important. Your initial tread measurement should include the nosing. If your tread measurement already goes to the very edge of the nosing, then you have accounted for it. Some people measure the tread flat and then add an extra inch or two for the nosing. I always include the nosing in the initial tread measurement to avoid underestimation.
For instance, if your tread is 10 inches, and 1.25 inches of that is nosing, you would measure the full 10 inches. Then add the riser height. This ensures the carpet wraps neatly around the front of the step. Ignoring the nosing means your carpet will be too short. It will not cover the edge properly. This leads to an unfinished look and potential tripping hazards. Always ensure your measurements fully cover the nosing.
Accounting For Waste, Patterns, And Landing Areas
Getting the raw linear footage for your 13 stairs is a great start. However, you cannot just buy that exact amount. You must account for waste, pattern repeats, and any landing areas. These factors significantly impact your final carpet order. Failing to do so means you will run short or have mismatched patterns.
Why You Need Extra Carpet
Carpet installation is not a perfect science. You will inevitably have some waste. This comes from:
- Cuts: You make precise cuts for each step. Sometimes, cuts are not perfect, and you need to re-cut.
- Seams: If your stairs are very wide or if you are doing a complex layout, you might need seams. You need extra material to hide these.
- Errors: Everyone makes mistakes. Having extra allows for a do-over without halting the project.
- Future Repairs: Keeping a small remnant allows for patch repairs later if a section gets damaged.
A common rule of thumb is to add 10% to 20% to your calculated linear footage. For 13 stairs, if you calculated 18.42 linear feet, adding 15% would mean: 18.42 feet * 1.15 = 21.18 feet. This extra material is a good investment.
Pattern Repeats and Direction
If you choose a carpet with a distinct pattern, you need even more extra material. Patterns must align from one step to the next for a cohesive look. This is called a “pattern repeat.”
- Identify Repeat Size: Carpet manufacturers specify the pattern repeat length. It could be 18 inches, 24 inches, or more.
- Add for Each Step: For each step, you need the length to cover the tread and riser, plus enough to match the pattern at the top of the riser for the next step. This often means buying a length equal to your tread + riser + one full pattern repeat for each step.
- Direction: Also, ensure the pattern runs in the same direction on all steps. Carpet has a “nap” or pile direction. Installing pieces in different directions makes the carpet look mismatched.
For a patterned carpet, the waste factor can jump to 20-30% or even higher, depending on the pattern size. Discuss this with your carpet supplier. They can help you calculate the specific overage needed for your chosen pattern.
Measuring for Landings and Winders
Your staircase might not be straight with 13 identical steps. Many stairs include landings or “winder” steps. These need special attention.
- Landings: A landing is a flat area between flights of stairs. Treat a landing as a separate room measurement. Measure its length and width. This gives you square footage. Convert this to linear feet based on the carpet roll width (e.g., a 6x3 foot landing on a 12-foot wide roll means you need 6 linear feet of that 12-foot wide carpet).
- Winder Steps: Winder steps are triangular or pie-shaped steps used to change direction without a landing. These are the most challenging to carpet. You cannot use the simple tread + riser formula. You need to create templates for each winder step. Measure each side and the longest diagonal to ensure full coverage. This usually means more waste because of the irregular shapes.
Always factor in these unique elements. For instance, if you have a landing, you might also be interested in how to keep carpet clean in high-traffic areas, as landings often experience significant wear.
Tools And Materials You Will Need For Stair Carpeting
Installing carpet on 13 stairs requires more than just carpet. You need specific tools and materials for a successful, professional-looking job. Having everything ready before you start saves time and frustration. I always make a checklist.
Essential Tools
- Knee Kicker: This tool helps stretch the carpet and secure it into place. You use your knee to push it. It is crucial for tight installations, especially on stairs.
- Stair Tool (or Stair Tucking Tool): This is a specialized tool used to tuck the carpet neatly into the crease where the tread meets the riser. It gives a clean, finished edge.
- Carpet Seaming Iron (if needed): If your stairs are very wide and require seams, this iron melts seaming tape to join carpet pieces.
- Utility Knife and Blades: A sharp utility knife is essential for cutting carpet. Keep extra blades handy, as carpet dulls them quickly.
- Tape Measure: A long, rigid tape measure is best for accurate measurements.
- Staple Gun and Staples: You will need a heavy-duty staple gun (manual or electric) to secure the carpet to the stairs.
- Hammer: For tack strips and general adjustments.
- Gloves: Protect your hands from staples and rough edges.
- Pry Bar: If you are removing old carpet, a pry bar helps lift tack strips and old padding. Removing old carpet might also lead to thinking about what to do next, like how to create stairs after carpet if you plan to expose or finish the wood.
Having these tools ready makes the installation process much smoother. Skipping a tool often leads to shortcuts that hurt the final look and durability.
Necessary Materials
- Carpet: Your chosen carpet, measured accurately with extra for waste and patterns.
- Carpet Padding: Padding adds comfort, insulation, and extends the life of your carpet. It also makes the stairs feel softer underfoot. You will need to calculate the same linear feet as your carpet, accounting for width.
- Tack Strips: These wooden strips have sharp pins that grip the carpet. They are installed at the back of the tread and the bottom of the riser. You will need enough tack strips to cover the width of each tread and riser.
- Seaming Tape (if needed): For joining carpet pieces.
- Adhesive (optional): Some installers use carpet adhesive in addition to tack strips for extra security, especially on nosings.
- Trim or Molding (optional): To finish edges if your stairs are open on one side.
Using the right materials ensures your carpet installation is secure and lasts for many years. Always purchase high-quality padding, as it makes a big difference in comfort and durability. You will also want to make sure the carpet stays put. You can explore tips on how to keep a carpet down for various situations.
Step-by-Step Installation Process (Simplified)
Installing carpet on 13 stairs is a multi-step process. While a professional might offer the best results, understanding the steps helps you if you DIY or supervise. This simplified overview covers the core actions. Proper installation ensures your carpet is safe and durable.
Preparing Your Stairs
First, prepare the stairs. If old carpet exists, remove it. This includes the carpet, padding, and all old tack strips and staples. Use your pry bar and pliers. Clean the stairs thoroughly. Sand any rough spots on the wood. Ensure the stairs are clean, dry, and free of debris. Any bumps or dirt will show through the new carpet. If you are stripping and painting, you might want to look into how to rip up carpet and paint stairs before carpeting.
Installing Padding and Tack Strips
Next, install the padding and tack strips.
- Tack Strips: Place tack strips on each tread, approximately half an inch from the riser. The pins should face the riser. For full coverage, also place tack strips at the bottom of each riser, half an inch from the tread below it. The pins should face upwards towards the next tread.
- Padding: Cut the padding to fit each tread and riser. Staple the padding securely to the treads and risers. Do not extend padding over the nosing; it should stop just before the nosing edge. This prevents the nosing from feeling “spongy.”
Laying and Securing the Carpet
Now, you are ready to lay the carpet.
- Start from the Top: Begin installing carpet from the top step. Cut your first piece to cover the top riser and tread.
- Secure: Use your knee kicker to stretch the carpet over the tack strips on the tread. Then, use the stair tool to tuck the carpet firmly into the crease where the tread meets the riser.
- Wrap Nosing: Ensure the carpet wraps smoothly over the nosing. You might need to use a staple gun underneath the nosing for extra security, especially with stair runners.
- Repeat: Work your way down, step by step. Each new piece of carpet will typically start at the top of a riser, covering it and the next tread. This way, seams are hidden neatly in the crease.
- Finish Edges: Trim excess carpet with your utility knife, ensuring neat, straight lines. For runners, make sure the edges are straight and even down the visible sides of the stairs.
This process ensures a tight, secure fit. A tight fit prevents the carpet from shifting. It also makes your stairs safer. If you ever need to tighten a loose carpet, you might find information on what is the tool required to tighten carpet against stairs useful for maintenance.
Professional Installation vs. DIY: Costs And Considerations
Deciding between professional carpet installation and a do-it-yourself (DIY) approach for your 13 stairs involves weighing costs, skill levels, and desired outcomes. Both options have distinct advantages and disadvantages. I always consider the complexity of the job when making this decision.
The DIY Approach
Pros:
- Cost Savings: This is the biggest advantage. You save on labor costs. You only pay for materials: carpet, padding, tack strips, and tools.
- Personal Satisfaction: Completing a home project yourself brings a sense of accomplishment.
- Scheduling Flexibility: You work on your own schedule.
Cons:
- Time-Consuming: Installing carpet, especially on stairs, takes a lot of time. It might be a weekend-long project or longer.
- Skill Required: Stair carpeting is one of the more challenging DIY flooring jobs. You need to make precise cuts, stretch the carpet properly, and ensure it is securely fastened. Incorrect installation can lead to loose carpet, tripping hazards, and an unprofessional look.
- Tool Investment: You might need to buy or rent specialized tools like a knee kicker and stair tool. These add to your initial cost.
- Potential for Waste: Without experience, you might make cutting errors, leading to more wasted carpet.
I have found that for a job involving 13 stairs, the learning curve can be steep. If you are very handy and patient, DIY is feasible.
Professional Installation
Pros:
- Expertise and Experience: Professionals have the tools, skills, and experience to install carpet flawlessly. They know how to handle complex stair layouts and pattern matching.
- Time-Saving: Installers complete the job much faster than a DIYer.
- Guaranteed Workmanship: Many installers offer warranties on their work. This gives you peace of mind.
- Better Results: A professional job generally looks cleaner and lasts longer. They ensure the carpet is stretched correctly to prevent premature wear and wrinkles.
- Less Waste: Professionals are more efficient with cuts, potentially reducing material waste.
Cons:
- Higher Cost: You pay for labor in addition to materials. This significantly increases the total project cost.
- Scheduling: You must work around the installer’s schedule.
Cost Considerations:
- DIY Cost: Primarily material cost (carpet, padding, tack strips) + tool rental/purchase.
- Professional Cost: Material cost + labor cost (often charged per step or per linear foot for stairs, ranging from $5 to $15+ per linear foot for labor alone).
For 13 stairs, the labor cost can add hundreds of dollars. However, the quality and peace of mind often justify the expense. If your stairs are complex (e.g., winders, open sides), hiring a professional is almost always the better choice. If you are considering the long-term wear and tear, having a perfectly installed carpet can make a big difference. For example, knowing how to make my carpeted stairs slip-proof often starts with correct installation.
Maintaining Your New Stair Carpet
Once your 13 stairs are beautifully carpeted, proper maintenance becomes key. Regular care extends the life of your carpet and keeps it looking fresh. Stairs are high-traffic areas, so they need more attention than other carpeted spaces. I always emphasize consistent cleaning habits for stairs.
Regular Cleaning Routine
- Vacuum Frequently: Vacuum your stair carpet at least once a week, or more often if it sees heavy use. Use a vacuum cleaner with a hose attachment and specialized stair tools. Pay close attention to the edges and the crease where the tread meets the riser. Dirt and debris often accumulate in these areas.
- Spot Clean Spills Immediately: Accidents happen. Blot spills with a clean cloth as soon as they occur. Do not rub, as this can push the stain deeper into the fibers. Use a carpet-safe cleaner, testing it on an inconspicuous area first.
- Protect from Wear: Consider using small throw rugs or protectors on the top and bottom steps. These steps receive the most traffic. This simple step can significantly prolong the life of your carpet.
For general carpet cleaning, you might find useful tips on how to clean a whole room of carpet, as many of the principles apply to stairs too.
Deep Cleaning and Professional Care
- Scheduled Deep Cleaning: Plan for a deep cleaning every 12 to 18 months. This involves hot water extraction (steam cleaning) or dry cleaning methods. Deep cleaning removes embedded dirt and allergens that regular vacuuming cannot reach. You can either rent a machine or hire a professional carpet cleaner.
- Professional Inspection: Sometimes, it is good to have a professional check the carpet. They can re-stretch it if it becomes loose. Loose carpet is a tripping hazard. They can also identify minor issues before they become major problems.
- Address Loose Areas: If you notice any areas where the carpet is lifting or feels loose, address it quickly. A knee kicker or stair tool can help tighten the carpet back into place. For tools specific to tightening, you can reference resources like what is the tool required to tighten carpet against stairs.
Protecting Your Investment
- No Shoes Policy: Encourage family members and guests to remove shoes before walking on the carpeted stairs. This reduces the amount of dirt and abrasive particles tracked onto the carpet.
- Pet Care: If you have pets, regular grooming helps reduce shedding and dander on the carpet. Clean up pet accidents promptly and thoroughly to prevent odors and stains.
- Sunlight Protection: If your stairs receive direct sunlight, consider curtains or blinds. Prolonged exposure to UV rays can fade carpet colors over time.
By following these maintenance tips, your carpeted stairs will remain beautiful and functional for years. Consistent care means your investment lasts longer.
Frequently Asked Questions
How do I measure a spiral staircase for carpet?
Measuring a spiral staircase is very complex. You cannot use the standard tread-and-riser method. Each step is unique, often pie-shaped. You need to create individual paper templates for each tread and riser. This ensures accurate cuts for the irregular shapes. It is usually best to hire a professional for spiral staircase carpeting due to its difficulty.
Is carpet padding necessary for stairs?
Yes, carpet padding is highly recommended for stairs. It adds cushioning, making the stairs more comfortable to walk on. Padding also absorbs impact, which helps extend the life of your carpet. It also provides extra insulation and sound dampening. Skipping padding reduces the carpet’s durability and comfort.
Can I install carpet on stairs without tack strips?
You can, but it is not ideal for permanent installation. Some temporary solutions use heavy-duty double-sided tape or adhesive. However, tack strips provide the most secure and durable installation. They hold the carpet firmly, preventing shifting and wrinkling. For a long-lasting and safe carpet, tack strips are essential.
How do I calculate carpet for an open-sided staircase?
An open-sided staircase requires more careful measurement and finishing. You need to measure the tread, riser, and also the “return” or side cap. The carpet must wrap around the exposed edge of the stair. This adds to the overall linear feet needed and requires more intricate cutting and securing.
What is the typical lifespan of stair carpet?
The lifespan of stair carpet varies. It depends on traffic, carpet quality, and maintenance. On average, stair carpet lasts between 5 to 10 years. High-quality, durable carpet in a low-traffic home might last longer. Poor quality carpet or heavy use can shorten its lifespan significantly. Regular cleaning helps.
Should I paint my stairs before carpeting?
If you are doing full coverage carpeting, painting the stairs underneath is not strictly necessary. However, if you plan to install a stair runner, paint the exposed parts of the stairs first. This creates a finished look around the runner. It also protects the wood where the carpet does not cover it.
Conclusion
Finding out how many feet of carpet for 13 stairs requires careful measurement and planning. You need to calculate the linear feet for each step, account for waste, and consider any pattern repeats. Remember to include your tread, riser, and nosing in the measurements. Adding 10-20% extra ensures you have enough material for cuts and adjustments.
Whether you choose full coverage or a stair runner, precision is important. Gathering the right tools and materials before you start saves effort. Deciding between DIY and professional installation depends on your skills, time, and budget. Whichever path you take, consistent maintenance helps your new carpeted stairs last for many years. With these tips, you can confidently plan and execute your stair carpeting project.

Katria Melrose
Cleaning Specialist
With over 12 years of experience in commercial cleaning and a certification in workplace ergonomics, I’ve developed a deep understanding of what makes a workspace truly productive. At HEG, I specialize in helping people transform their home offices into clean, efficient, and comfortable environments. Through smart cleaning routines and strategic organization solutions, I empower readers to create spaces that support focus, comfort, and success—one well-organized desk at a time.